HaLOS Documentation
| Description | Documentation for HaLOS, a container-first operating system for Raspberry Pi |
| Author(s) | Hat Labs |
| Repository | https://github.com/halos-org/docs |
HaLOS Documentation
Welcome to the documentation for HaLOS (Hat Labs Operating System) — a container-first operating system for Raspberry Pi.
HaLOS provides a complete web-managed platform with single sign-on, a curated app store, and easy system administration. It is built on Debian and designed for both general-purpose and marine computing use cases.
Quick links
- Quick Start — Get HaLOS running in minutes
- Choosing an Image — Pick the right image for your hardware and use case
- User Guide — Learn how to use the web interface
- Architecture — Understand how HaLOS works under the hood
- Developer Guide — Contribute to HaLOS development
Features
- Web Management — Cockpit-based system administration with HaLOS branding
- Single Sign-On — Authelia-powered authentication across all services
- Container Apps — Install and manage applications from a curated store
- Reverse Proxy — Traefik routes traffic to services with automatic TLS
- Dashboard — Homarr provides a unified launcher for all installed apps
- Marine Integration — Optional Signal K, InfluxDB, and Grafana stack for boat systems
Getting Started
Quick Start
Get HaLOS running on your Raspberry Pi in under five minutes.
Prerequisites
- Raspberry Pi 4, Raspberry Pi 5, or HALPI2
- SD card or SSD (16 GB minimum, 32 GB+ recommended)
- Internet connection — required on first boot to download container images
- Ethernet cable (recommended) or WiFi access via AP image
- Another device (laptop, phone, tablet) with a web browser
1. Download the image
Download your preferred image from the HaLOS releases page.
Not sure which image to pick? See Choosing an Image. For a generic Raspberry Pi without marine needs, start with Halos-RPI.
2. Flash the image
- Download and install Raspberry Pi Imager.
- Insert your SD card or connect your SSD via a USB adapter.
- Open Raspberry Pi Imager, click Choose OS → Use custom, and select the downloaded HaLOS image.
- Select your target drive and click Write.
Do not apply OS customization
When Raspberry Pi Imager offers to apply OS customization settings, click No. HaLOS has its own first-boot configuration.
For HALPI2 with an NVMe SSD, follow the HALPI2 flashing instructions instead.
Already running HaLOS?
If the device is already running and reachable over SSH, you can re-flash it without removing the storage media. See Flashing Over the Network.
CM5 with eMMC
If flashing a HALPI2 image to a Compute Module 5's eMMC, you must edit config.txt on the boot partition after flashing: comment out the dtparam=sd=off line. Without this change, the system won't boot. See Troubleshooting for details.
3. Boot and connect
Internet required
HaLOS downloads container images on first boot. The device needs internet access before the web interface becomes available.
With Ethernet (recommended): Connect the Pi to your network with an Ethernet cable, then power on. The device gets internet access immediately via DHCP. Wait 2–3 minutes for containers to download and start, then open https://halos.local/.
Without Ethernet (AP image only): Use an AP image variant. After powering on:
- Connect your laptop/phone to the
Halos-XXXXWiFi network (password:halos1234). - Open https://halos.local:9090/ — this is Cockpit, which runs without containers.
- Log in with username
pi, passwordhalos. - Go to Networking and connect the device to your WiFi network (one that has internet access).
- Wait 2–3 minutes for containers to download, then open https://halos.local/.
4. Accept the certificate warning
Your browser will display a certificate warning because HaLOS uses a self-signed certificate. This is expected — accept the warning to proceed. You only need to do this once per hostname.
5. Log in
Enter the default SSO credentials:
| Username | admin |
| Password | halos |
Change default passwords immediately
After logging in, change the SSO password through the Authelia portal and the system password (pi user) through the Cockpit Users panel. See First Boot — Default credentials for details.
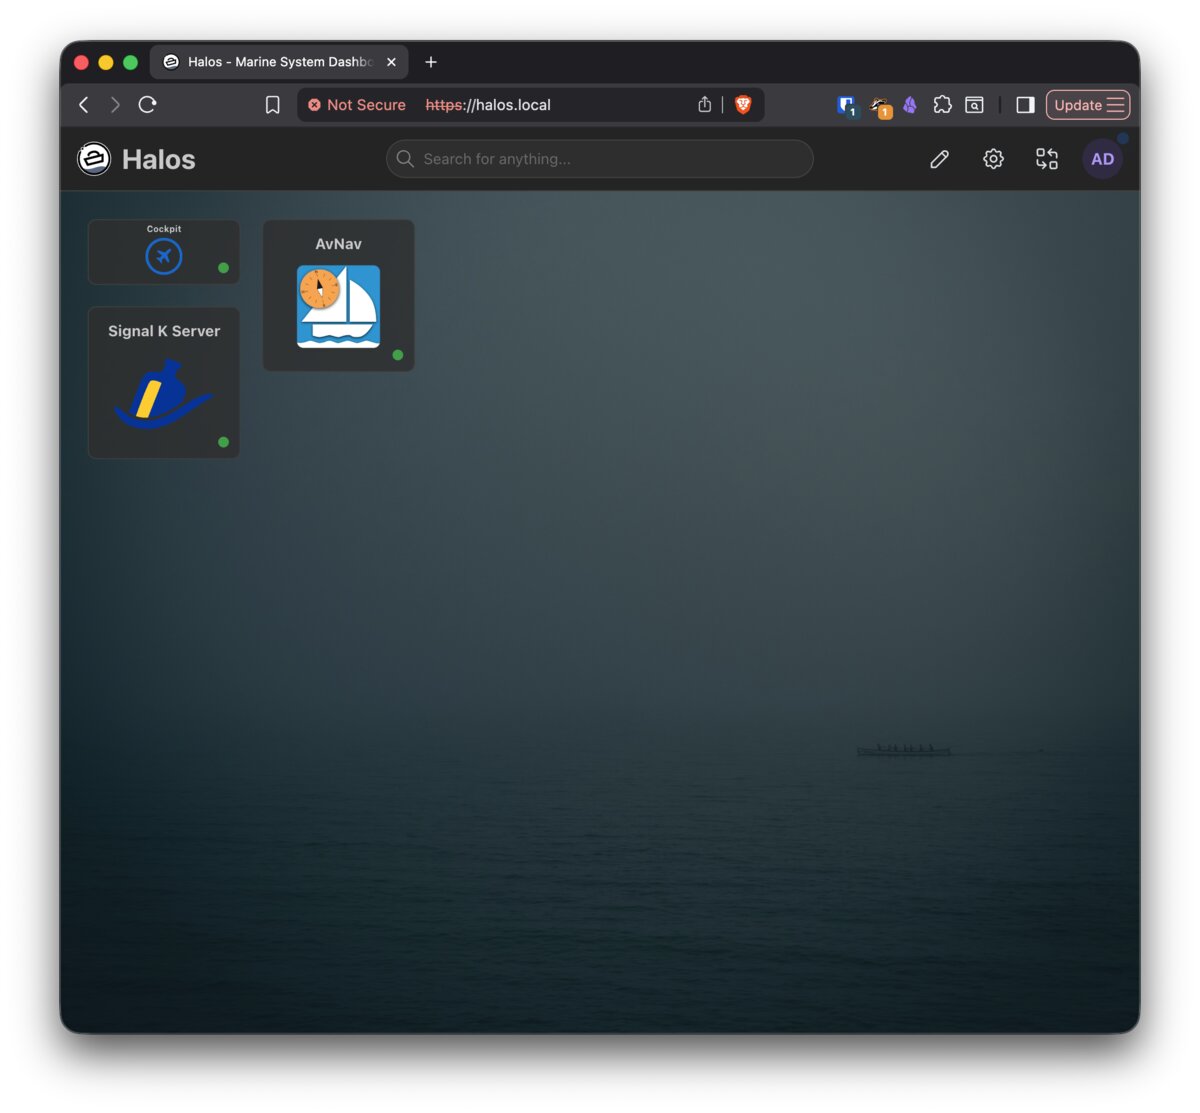
You're now on the HaLOS dashboard — a launchpad for all installed services.
Next steps
- First Boot — Detailed walkthrough of the boot process, connectivity options, and initial setup
- Web Interface — Learn how the web interface is organized
- Installing Apps — Browse and install applications from the container store
- Marine Apps — Set up Signal K, Grafana, and other marine applications
Choosing an Image
HaLOS images are built along three axes: hardware platform, desktop environment, and software stack. This page helps you pick the right combination.
Decision guide
Do you have a HALPI2? Use a HALPI2 image — it includes drivers for CAN bus, RS-485, I2C, and power management. Otherwise, use an RPI image for any Raspberry Pi 4 or 5.
Do you need a desktop? Most users don't — the headless images give you full control through the web interface. Choose a Desktop image only if you plan to connect a monitor and use graphical applications directly on the Pi.
Do you need marine apps? If you're installing HaLOS on a boat, choose a Marine image. It includes the Marine App Store with Signal K, InfluxDB, Grafana, AvNav, and other marine applications.
Hardware platform
| Platform | Target hardware | Extras |
|---|---|---|
| HALPI2 | Hat Labs HALPI2 | CAN bus, RS-485, I2C, power management drivers |
| RPI | Raspberry Pi 4 or 5 | No hardware-specific drivers |
Desktop environment
| Option | Description |
|---|---|
| Headless (default) | No desktop GUI. All management through the web interface. SSH available. |
| Desktop | Includes XFCE desktop environment for local monitor use. |
Software stack
| Stack | What's included |
|---|---|
| Standard (default) | Cockpit web management, container store, Traefik, Authelia, Homarr |
| Marine | Everything in Standard, plus the Marine App Store with Signal K and other marine apps |
Image comparison table
| Image | Hardware | Desktop | Marine Apps |
|---|---|---|---|
Halos-HALPI2 |
HALPI2 | No | No |
Halos-Desktop-HALPI2 |
HALPI2 | Yes | No |
Halos-Marine-HALPI2 |
HALPI2 | No | Yes |
Halos-Desktop-Marine-HALPI2 |
HALPI2 | Yes | Yes |
Halos-RPI |
Generic RPi | No | No |
Halos-Desktop-RPI |
Generic RPi | Yes | No |
Halos-Marine-RPI |
Generic RPi | No | Yes |
Halos-Desktop-Marine-RPI |
Generic RPi | Yes | Yes |
Access point variant
All headless images include a built-in WiFi access point for initial setup without Ethernet. On first boot, the device creates a WiFi network named Halos-XXXX (XXXX is unique to your device, password: halos1234) that you can connect to immediately.
For desktop images, only one variant includes the access point:
Halos-Desktop-Marine-HALPI2-AP— Same asHalos-Desktop-Marine-HALPI2but with the WiFi access point pre-configured.
Stock Raspberry Pi OS variants
These images include HALPI2 drivers but not the HaLOS web stack (no Traefik, Authelia, Homarr, or Cockpit). Use them if you want a standard Raspberry Pi OS with HALPI2 hardware support.
| Image | Description |
|---|---|
Raspios-lite-HALPI2 |
Headless Raspberry Pi OS with HALPI2 drivers |
Raspios-HALPI2 |
Desktop Raspberry Pi OS with HALPI2 drivers |
Download
All images are available on the HaLOS releases page.
Once you've chosen your image, proceed to Quick Start for flashing instructions, or First Boot for what happens next.
First Boot
What to expect when you power on HaLOS for the first time.
Boot sequence
After you insert the flashed SD card or SSD and power on:
- Linux boot (~30 seconds) — Standard Raspberry Pi OS startup.
- First-boot initialization (~1 minute) — HaLOS configures the system, generates certificates, and prepares container services.
- Container image download and startup (~1–2 minutes) — Core containers (Traefik, Authelia, Homarr) are downloaded from the internet and started.
Internet required
Container images are not included in the HaLOS image — they are downloaded on first boot. The device must have internet access before the main web interface becomes available. Without internet, only Cockpit on port 9090 is functional.
The total time from power-on to a working web interface is typically 2–3 minutes (assuming an internet connection is available). During this time, the web interface at https://halos.local/ will not respond — this is normal.
Connecting to HaLOS
How you reach the device for the first time depends on your image and whether Ethernet is available. Pick the one that matches your setup.
With Ethernet (recommended, any image)
- Connect an Ethernet cable between the Raspberry Pi and your local network. This gives the device both internet access (for downloading containers) and local access.
- Wait 2–3 minutes for containers to download and start.
- Open https://halos.local/.
mDNS (.local hostname resolution) works on most operating systems out of the box. If halos.local doesn't resolve, check your router's DHCP client list for the device's IP address and use that instead.
Desktop WiFi (Desktop images with a display)
With a monitor, keyboard, and mouse connected to the Pi, connect to WiFi from the desktop, just like any desktop Linux:
- Click the NetworkManager applet in the top panel (right edge of the screen).
- Select your WiFi network and enter the password.
- Wait 2–3 minutes for containers to download and start.
- Open https://halos.local/ on the Pi or another device on the same network.
WiFi access point (headless images and the AP desktop variant)
Headless images and the AP desktop variant start their own WiFi hotspot on first boot, so you can reach the device without Ethernet or a display. The hotspot has no internet of its own — the goal of this step is to use it to point the device at a WiFi network that does.
- On your laptop or phone, connect to the
Halos-XXXXhotspot (password:halos1234). - Open https://halos.local:9090/. This is Cockpit, which runs without containers and is reachable straight away.
- Log in with the system credentials: username
pi, passwordhalos. - Go to Networking, click WiFi (wlan0), pick a network with internet access, enter the password, and click Add. For more detail, see WiFi through Cockpit.
When the device joins your network, it keeps the Halos-XXXX hotspot running and acts as a WiFi client at the same time. To do this it moves the hotspot onto your network's channel, so your laptop may drop off Halos-XXXX for a few seconds and then reconnect on its own. This is normal — wait for the connection to come back.
- Wait 2–3 minutes for the container images to download and start.
- Open https://halos.local/ to reach the main web interface.
Tip
You can stay on the Halos-XXXX hotspot to finish setup, or switch your laptop to the WiFi network you just configured — that network gives your laptop internet access too, and halos.local works from there as well.
Certificate warning
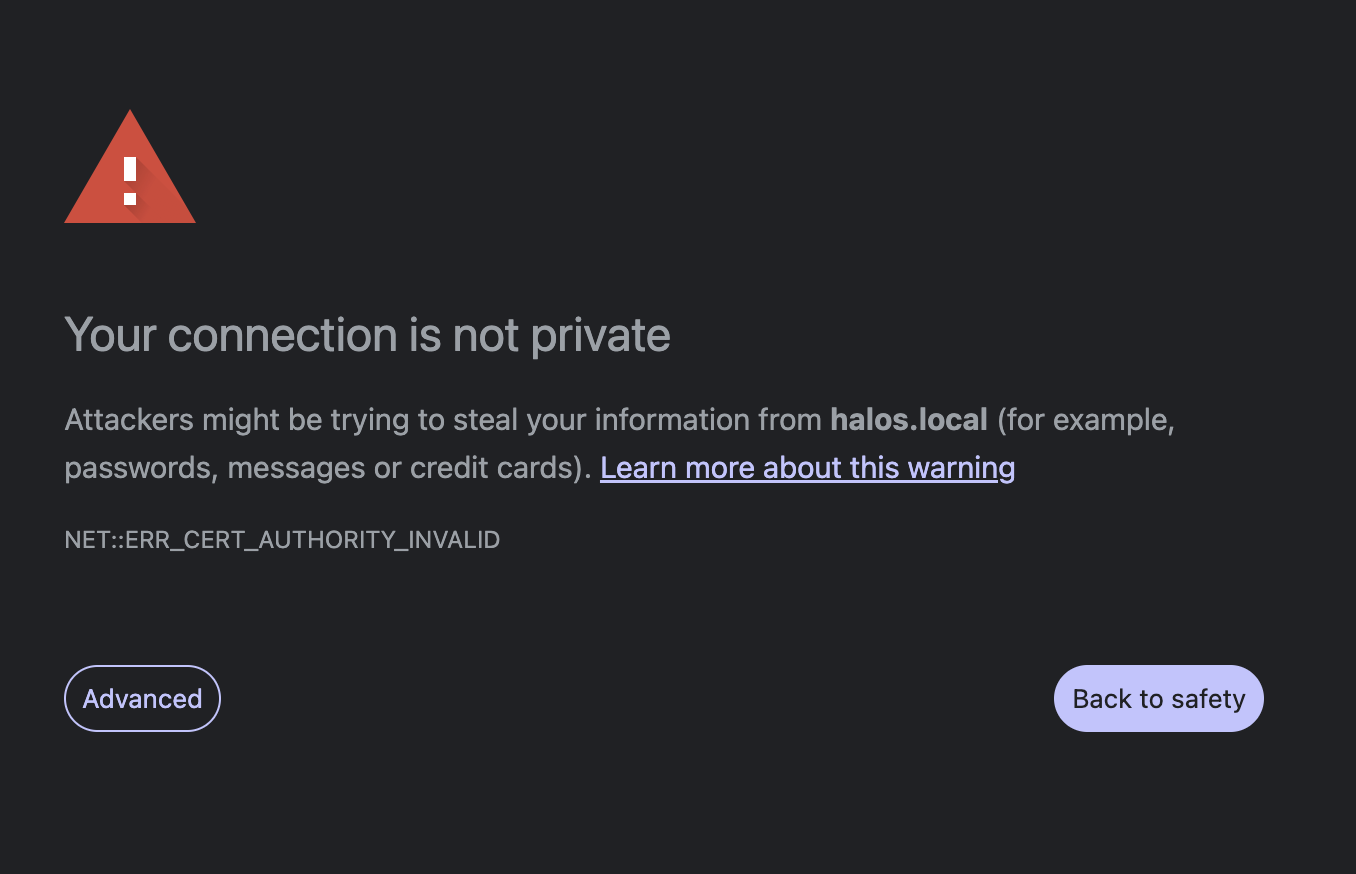
HaLOS uses a self-signed TLS certificate to encrypt all web traffic. Your browser will show a security warning on first access. This is expected.
How to proceed:
- Chrome: Click "Advanced" → "Proceed to halos.local (unsafe)"
- Firefox: Click "Advanced…" → "Accept the Risk and Continue"
- Safari: Click "Show Details" → "visit this website"
Certificate warnings per port
The certificate is issued for halos.local and covers all ports. However, browsers treat each port as a separate origin, so you'll see a certificate warning the first time you access each app's port (e.g., :3000, :3001). Cockpit on port 9090 uses its own certificate, so you'll see a separate warning for that too.
Why self-signed?
Automatic certificates from Let's Encrypt require a public domain name and internet-accessible ports 80/443. Since HaLOS runs on a local network with a .local mDNS hostname, self-signed certificates are the practical choice. Future versions may offer additional certificate options.
Default credentials
HaLOS has two separate authentication systems:
SSO login (Authelia)
Used for the main web interface and all applications behind the reverse proxy.
| Username | admin |
| Password | halos |
System login (Cockpit / SSH)
Used for Cockpit direct access on port 9090 and SSH.
| Username | pi |
| Password | halos |
Change both passwords immediately
After first login, change the SSO password through the Authelia portal and the system password through the Cockpit Users panel. See System Management.
Backup access
If the main web interface at https://halos.local/ isn't responding (for example, if a core container hasn't started yet), Cockpit is available directly at:
This bypasses Traefik and Authelia entirely. Log in with the system credentials (pi / halos). From Cockpit you can check service status, view logs, and troubleshoot.
What you'll see
After logging in to the main interface, you'll land on the HaLOS dashboard — a Homarr-based app launcher showing tiles for all installed services.
From here you can:
- Click any tile to open that application
- Access Cockpit for system administration
- Install additional apps from the container store
Next steps
- Web Interface — Understand the web interface architecture
- System Management — Configure your system via Cockpit
- Installing Apps — Add applications from the container store
Installing on Existing OS
Already running Raspberry Pi OS? You can install the HaLOS software stack without reflashing.
Requirements
- Raspberry Pi OS Trixie (Debian 13), arm64 architecture
- Raspberry Pi 4 or 5
- An active internet connection
Trixie only
HaLOS packages are built for Debian Trixie. They are not tested on Bookworm or other Debian releases.
1. Add the Hat Labs APT repository
Import the GPG signing key and add the repository source:
# Import the GPG key
curl -fsSL https://apt.hatlabs.fi/hat-labs-apt-key.asc \
  | sudo gpg --dearmor -o /usr/share/keyrings/hatlabs.gpg

# Add the repository
echo "deb [signed-by=/usr/share/keyrings/hatlabs.gpg] https://apt.hatlabs.fi trixie-stable main" \
  | sudo tee /etc/apt/sources.list.d/hatlabs.list

# Update package lists
sudo apt update
2. Install HaLOS
Choose the metapackage that fits your needs:
Installs the base HaLOS stack: Traefik reverse proxy, Authelia SSO, Homarr dashboard, Cockpit system management, and the container app store.
3. Wait for containers to start
After installation, the core containers (Traefik, Authelia, Homarr) need 2–3 minutes to pull images and start up.
4. Access the web interface
Open a browser and go to:
Replace <your-hostname> with your Pi's actual hostname (check with hostname in the terminal).
- Accept the self-signed certificate warning (see First Boot — Certificate warning)
- Log in with SSO credentials:
admin/halos - Change the default password immediately
Differences from a HaLOS image
When installing on an existing OS rather than using a pre-built image:
- The system hostname is whatever you already have configured (not
halos). Your URLs will behttps://<your-hostname>.local/andhttps://<app>.<your-hostname>.local/. - Your existing user account and SSH configuration are preserved.
- Desktop environment and other packages you've installed remain untouched.
- HALPI2 hardware drivers are not included — those are only in the HALPI2 image variants.
Next steps
- Web Interface — Learn how the web interface is organized
- Installing Apps — Browse and install applications
Flashing Over the Network
Re-flash a running HaLOS device without removing the SD card or SSD, using flash-live-system.
When to use this
- Re-flashing a device that's already running and reachable over SSH
- HALPI2 with NVMe SSD — the drive isn't easily removable
- Automated deployments with pre-configured hostname, user, WiFi, and SSH keys
This completely erases the target device
flash-live-system overwrites the entire boot disk. All data on the device is lost. Make sure you're flashing the right device.
Prerequisites
- A HaLOS device running and reachable over SSH
- The
flash-live-systemtool installed on your computer (see below) - A HaLOS image file (
.img,.img.xz, or.img.gz)
1. Install flash-live-system
Download the pre-built script on your computer:
sudo curl -Lo /usr/local/bin/flash-live-system \
  https://github.com/hatlabs/flash-live-system/releases/latest/download/flash-live-system
sudo chmod +x /usr/local/bin/flash-live-system
2. Download the image
Download your preferred image from the HaLOS releases page. Not sure which image to pick? See Choosing an Image.
3. Create a config file (optional)
A config file lets you pre-configure the new image on first boot — hostname, user account, WiFi, and SSH keys are all set automatically, so you don't need to go through the manual first-boot setup.
Create a file (e.g., myboat.conf):
hostname=myboat
user=captain
password=changeme
ssh-key=~/.ssh/id_ed25519.pub
wifi-ssid=MyNetwork
wifi-password=MyWifiPass
wifi-country=FI
| Key | Description |
|---|---|
hostname |
System hostname |
user |
Username (renames the default UID 1000 user) |
password |
User password |
ssh-key |
SSH public key file path (repeatable for multiple keys) |
wifi-ssid |
WiFi network name (requires wifi-password) |
wifi-password |
WiFi password (requires wifi-ssid) |
wifi-country |
WiFi regulatory domain, e.g. FI, US, GB (default: GB) |
SSH keys
If you set user without any ssh-key lines, your ~/.ssh/*.pub keys are added automatically. Tilde (~/) in paths is expanded.
4. Flash the device
First, copy the image to the device:
Or download it directly on the device:
ssh halos.local
curl -LO https://github.com/halos-org/halos-pi-gen/releases/latest/download/Halos-Marine-HALPI2.img.xz
Then run flash-live-system on the device:
The tool auto-detects the safest flash method based on available RAM and disk layout.
Flash a device over SSH from your computer:
The tool copies the compressed image to the device's RAM, then decompresses and writes it to disk. If the transfer fails, no destructive action has happened — the device is fully recoverable.
Remote flashing can fail silently
Firewalls on your computer (common on macOS and Linux desktops) can block the image transfer to the device. When this happens, the flash fails without any error — the device simply reboots to the previous OS. If this happens, use the on-device method instead.
Before writing, the tool asks you to confirm by typing a phrase:
5. Wait for reboot
After flashing, the device reboots automatically. If you provided a config file, first boot takes an extra minute to apply settings (hostname, user, WiFi) before rebooting once more into the fully configured system.
Once the device is back up, continue with First Boot to verify everything is working.
Console messages during flashing
You may see EXT4-fs errors on the device's console while flashing. These are expected and harmless — the old filesystem is being overwritten, and the kernel reports the underlying data changes as corruption.
Ramfs vs. stream mode
By default, flash-live-system uses ramfs mode: the compressed image is copied to RAM first, verified, then written to disk. This is the safest option — a failed transfer doesn't touch the disk.
If the device doesn't have enough RAM to hold the compressed image (~4 GB+), use stream mode with --stream. This pipes the image directly to disk without buffering in RAM.
Stream mode risk
In stream mode, if the transfer fails mid-write, the device has a partial image and will need to be re-flashed manually (e.g., by removing the SD card and using Raspberry Pi Imager).
For full details on modes and advanced usage, see the flash-live-system documentation.
Next steps
- First Boot — What to expect after the device reboots
- Troubleshooting — Common issues and solutions
User Guide
Web Interface
HaLOS provides a unified browser-based interface for all system administration and application access. Everything runs through a reverse proxy with single sign-on.
Architecture
All web traffic flows through Traefik, which handles routing, TLS, and authentication:
graph LR
    Browser --> Traefik["Traefik<br/>(ports 80/443/4430-4450)"]
    Traefik --> Authelia["Authelia<br/>(SSO)"]
    Traefik --> Homarr["Homarr<br/>(Dashboard)"]
    Traefik --> Cockpit["Cockpit<br/>(System Admin)"]
Traefik --> Apps["Installed Apps<br/>(Signal K, Grafana, …)"]- Traefik listens on ports 80, 443, and 4430–4450, terminates TLS, and routes requests to apps on dedicated HTTPS ports.
- Authelia provides single sign-on. When you visit any protected service, Traefik checks with Authelia whether you have a valid session. If not, you're redirected to the login page.
- Homarr is the dashboard at the root URL — the first thing you see after login.
- Cockpit handles system administration (packages, services, networking, users).
URL scheme
HaLOS uses port-based routing with path redirects. Each application gets a dedicated HTTPS port, with a memorable path URL that redirects to it:
| URL | Service |
|---|---|
https://halos.local/ |
Homarr dashboard (home page) |
https://halos.local/sso/ |
Authelia login portal |
https://halos.local/cockpit/ |
Cockpit system management (redirects to :9090) |
https://halos.local/signalk-server/ |
Signal K server (marine) |
https://halos.local/grafana/ |
Grafana dashboards (marine) |
https://halos.local/influxdb/ |
InfluxDB admin (marine) |
https://halos.local/avnav/ |
AvNav navigation (marine) |
https://halos.local/opencpn/ |
OpenCPN chart plotter (marine) |
The path URLs (e.g., halos.local/grafana/) redirect to the app's dedicated HTTPS port. The exact apps available depend on which apps you have installed.
Custom hostnames
If your device hostname isn't halos, replace halos.local with <your-hostname>.local throughout. For example, a device named myboat uses https://myboat.local/ for the dashboard.
Login flow
- You open
https://halos.local/in your browser. - Traefik receives the request and checks with Authelia for a valid session.
- Authelia redirects you to its login page at
https://halos.local/sso/. - You enter your credentials (
admin/halosby default). - Authelia sets a session cookie and redirects you back to the original URL.
- Traefik sees the valid session and serves the Homarr dashboard.
The session cookie works across all ports on halos.local, so you only log in once. Subsequent visits to any app are seamless.
Navigation
Homarr dashboard is the hub — it shows tiles for every installed application. Click a tile to open that app in a new tab.
Cockpit is the system admin interface. Access it from:
- The Cockpit tile on the dashboard
- Directly at
https://halos.local:9090/(bypasses SSO, uses system credentials)
App UIs are accessed by clicking their dashboard tiles.
Cockpit direct access
Cockpit also runs independently on port 9090, outside the Traefik/Authelia stack. This provides a fallback if the reverse proxy is down and uses Linux system credentials (pi / halos) instead of SSO.
Access it at: https://halos.local:9090/
See System Management for details on what you can do in Cockpit.
Trust the device
Each HaLOS device runs its own small Certificate Authority (CA) on first boot and signs a single TLS leaf from it that all of the device's web services use — Traefik on :443, Cockpit on :9090, and every per-app port between 4430 and 4450.
By default your browser doesn't know about this CA, so you see a "Not secure" warning the first time you visit https://halos.local/. Clicking through works, but the warning comes back every time the device rotates its leaf and you have to re-decide for every port.
The cleaner path is to install the device's CA on your workstation once. After that:
- Every app on the device validates without a warning.
- Every port (
:443,:9090,:4430+) validates without a warning. - Leaf rotations are invisible — the trust anchor (the CA) is what your browser checks against, not the leaf itself.
Each HaLOS device has its own CA. If you have several devices, you install one CA per device on your workstation.
Install the CA
Each device serves a guided installer at:
Open that URL and follow the steps for your platform. The page detects your operating system, covers macOS, Windows, Linux, iOS, Android, and Firefox, and fills in the exact filename your device saves — that filename embeds the device's hostname, so several devices' CAs stay easy to tell apart in your trust store.
You'll get a "Not secure" warning on this first visit — that's the chicken-and-egg of trusting the CA before you trust the host. Click through it. If you want stronger guarantees before you install, verify the fingerprint first.
Verifying the fingerprint
To rule out a malicious network between your workstation and the device when you first download the CA, compare its SHA-256 fingerprint with what the device reports over SSH.
On your workstation:
curl -k -o /tmp/halos-ca.crt https://<your-device>/halos-ca.crt
openssl x509 -in /tmp/halos-ca.crt -noout -fingerprint -sha256
On the device (over SSH — out-of-band):
ssh <your-device> 'sudo openssl x509 -in /var/lib/container-apps/halos-core-containers/data/halos-core-containers/certs/ca/serving-ca.crt -noout -fingerprint -sha256'
The two fingerprints must match exactly. If they don't, abort — the file you downloaded isn't from the device.
The canonical version of this procedure lives in the developer docs: docs/CERTS.md → Chicken-and-egg.
Regenerate the device CA
A device's CA is created once and then frozen the first time a client downloads it. This "adoption" keeps the CA stable, so anchors you have already installed keep working. The CA's name embeds the device's hostname at the moment it was created. If you later rename the device — or it first booted before it had its final hostname — the name can read stale, and a device imaged with an older HaLOS may carry a generic HaLOS Device CA name with no hostname at all.
A stale name is cosmetic: HTTPS still validates, because browsers check the TLS leaf's hostnames, not the CA's name. Regenerate only when the stale name actually gets in your way — for example, you manage several devices and can no longer tell their CAs apart.
To mint a fresh CA with the current hostname, reset the adoption sentinel over SSH and re-run certificate management:
ssh <your-device> 'echo -n pending | sudo tee \
  /var/lib/container-apps/halos-core-containers/data/halos-core-containers/certs/ca/adoption'
ssh <your-device> 'sudo systemctl start halos-manage-certs.service'
The next run regenerates the CA with the current hostname, re-signs the leaf, and reloads Traefik and Cockpit on its own — no container restart, and no need to delete ca.crt or ca.key.
Warning
This replaces the CA. Every client that trusted the old one must remove it (see below) and install the new CA, which now downloads under a new, hostname-specific filename.
Removing the trust anchor
If you decommission a HaLOS device or no longer want to trust it, remove the CA from your workstation:
- macOS: Keychain Access → find the cert → delete → admin password.
- Windows:
certmgr.msc→ Trusted Root Certification Authorities → Certificates → find and delete. - Linux:
sudo rm /usr/local/share/ca-certificates/halos-ca.crt && sudo update-ca-certificates --fresh. - iOS: Settings → General → VPN & Device Management → tap the profile → Remove Profile.
- Android: Settings → search credentials → User credentials → tap the HaLOS CA → Remove (on stock Android: Security → Encryption & credentials → User credentials; the exact path varies by vendor).
- Firefox: Preferences → Certificates → View Certificates → Authorities → select → Delete or Distrust.
Subsequent visits to the device will fall back to "Not secure", as if you never installed the CA.
Re-flashing a device has the same effect: the new image generates a fresh CA, so any CA you previously installed for that hostname is now stale. Remove the old CA before installing the new one. If you visited the device on an older HaLOS version your browser may still have an HSTS pin cached, which blocks the usual click-through bypass on top of the cert mismatch — see Troubleshooting → Browser refuses to load the device after re-flashing for the one-time cleanup. Current HaLOS versions no longer emit HSTS, so once the cached pin is cleared the lockout will not recur.
Dashboard
The HaLOS dashboard is powered by Homarr, an application launcher that gives you a single place to access all installed services.
How it works
The dashboard shows a tile for each installed application. Tiles display the app name, icon, and a link to its web interface.
Apps appear automatically. When you install a container app, the homarr-container-adapter service detects the new container and adds it to the dashboard. When you remove an app, its tile disappears. No manual configuration needed.
The adapter discovers containers by looking for homarr.* Docker labels:
labels:
  homarr.enable: "true"
  homarr.name: "My App"
  homarr.url: "https://halos.local/my-app/"
  homarr.category: "Tools"
All HaLOS container packages include these labels, so every installed app shows up on the dashboard.
Using the dashboard
- Open an app: Click any tile to open that application.
- Categories: Apps are grouped by category (System, Monitoring, Marine, etc.).
- Status: Tiles indicate whether the underlying container is running.
Customization
Homarr supports layout and appearance customization through its built-in settings:
- Rearrange tiles: Drag and drop tiles to change their position.
- Themes: Switch between light and dark themes.
- Layout: Adjust the grid layout and tile sizes.
Access Homarr settings through the gear icon in the dashboard interface.
Note
HaLOS applies custom branding (logo, colors) to Homarr via the halos-homarr-branding package. These defaults can be overridden through the Homarr settings.
System Management
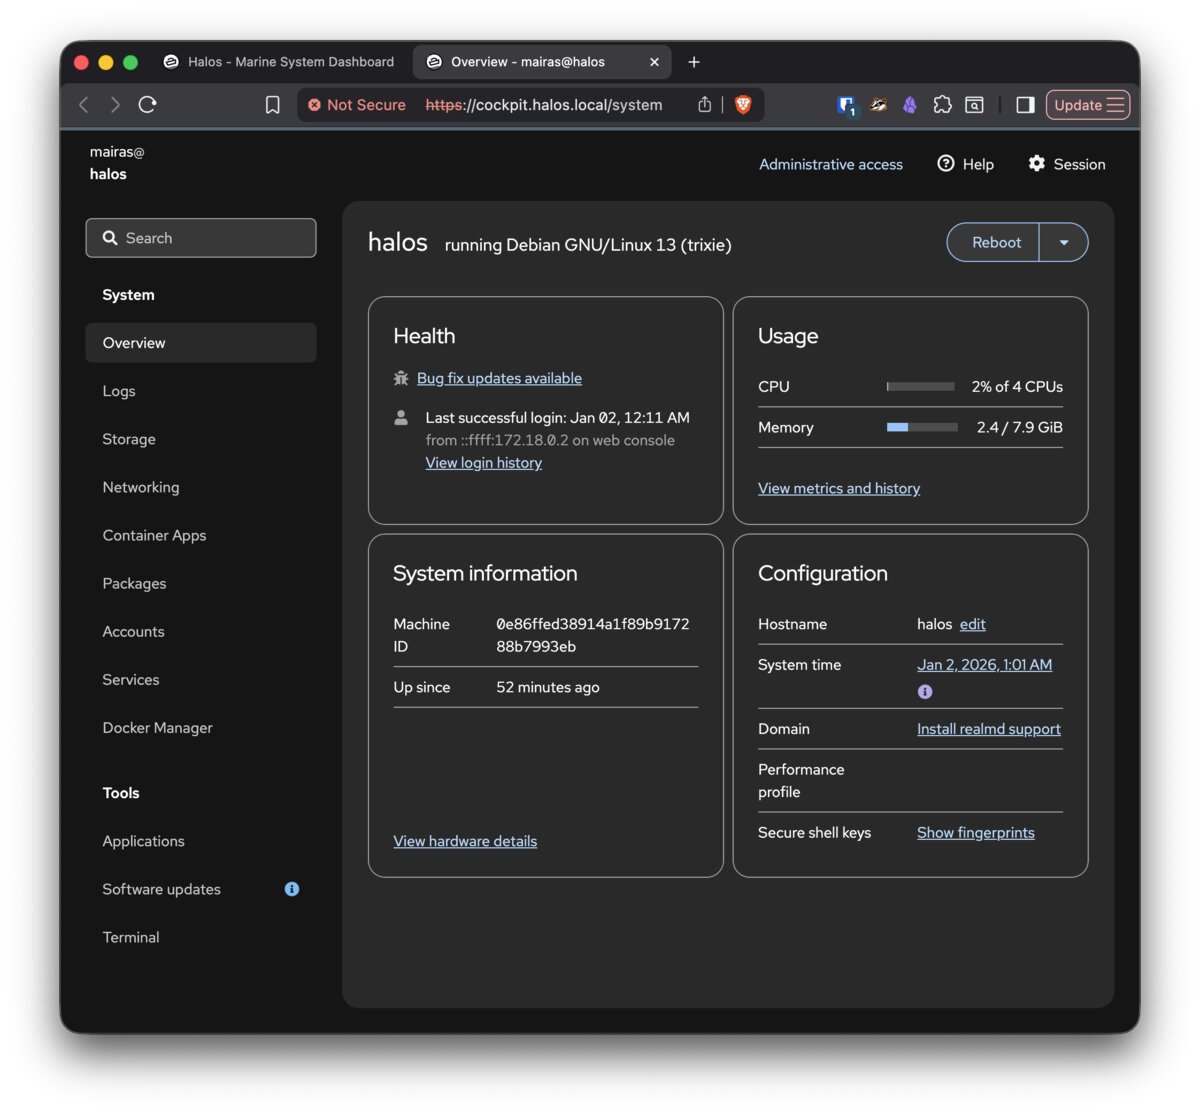
Cockpit is the system administration interface for HaLOS. It provides a web-based control panel for managing packages, services, networking, storage, and users.
Accessing Cockpit
There are two ways to reach Cockpit:
| Method | URL | Authentication |
|---|---|---|
| Via path redirect | https://halos.local/cockpit/ |
Redirects to port 9090 |
| Direct access | https://halos.local:9090/ |
System credentials (pi / halos) |
Direct access on port 9090 is always available, even if Traefik or Authelia are down. Use it as a fallback for troubleshooting.
Available modules
Overview
System resource monitoring: CPU usage, memory, disk space, and network activity. Shows system information (hostname, OS version, uptime).
Packages
Install and manage Debian packages via APT.
Use this panel — or run sudo apt update && sudo apt upgrade in the terminal — to keep your system up to date.
Terminal
A full command-line terminal in the browser. Useful for running commands without SSH.
Services
View and manage systemd services. You can start, stop, restart, and enable/disable services. Container apps run as systemd services (e.g., marine-signalk-server-container.service), so you can manage them here.
Logs
Browse and filter system logs from journald. Filter by service, priority, or time range to find relevant entries.
Users
Manage Linux system user accounts. This is where you should change the default pi password after first boot.
Sudo password
By default, HaLOS requires a password for sudo commands. This is an upstream Raspberry Pi OS change (Feb 2026), and HaLOS follows their defaults.
If you need passwordless sudo (e.g., for automation or development), you can disable the sudo password requirement.
Security consideration
Disabling the sudo password means any process running as your user can gain root access without a prompt. Only disable it on devices in trusted environments.
Container Apps
Browse and install containerized applications from the HaLOS app store. This is a separate module from the Packages panel — see Installing Apps for the full workflow.
Networking
Configure network interfaces via NetworkManager. See Networking for details on WiFi, Ethernet, and hostname configuration.
System updates
Keep your system current by running updates regularly:
First update after install
Run a system update immediately after first boot. This ensures the container app store has the latest package lists.
Storage
Cockpit shows disk usage and partition information. For Raspberry Pi setups, storage is typically:
- SD card or SSD: Main storage with the OS and all data
- USB drives: Optional additional storage, mountable through Cockpit
Installing Apps
HaLOS provides a container app store — a curated collection of applications packaged as Debian packages that run as Docker containers. Browse, install, and manage apps through the Cockpit web interface.
How it works
Installing a container app is a two-phase process:
-
Package install (fast) — HaLOS downloads and installs a small package that describes how to run the app. This takes only a few seconds.
-
Image pull (slow) — The app's actual software is then downloaded from the internet. This can take anywhere from 30 seconds to several minutes depending on the app size and your network speed.
The app only becomes accessible after the download completes and the app starts. It then appears on your dashboard automatically.
Under the hood
The package is a standard Debian .deb containing a Docker Compose file
(which defines the containers to run), a systemd service (which manages
the app lifecycle), and metadata for routing and dashboard integration.
The heavy download in phase 2 is Docker pulling the container image
layers from a registry.
Browsing the store
- Open Cockpit (via the dashboard tile or
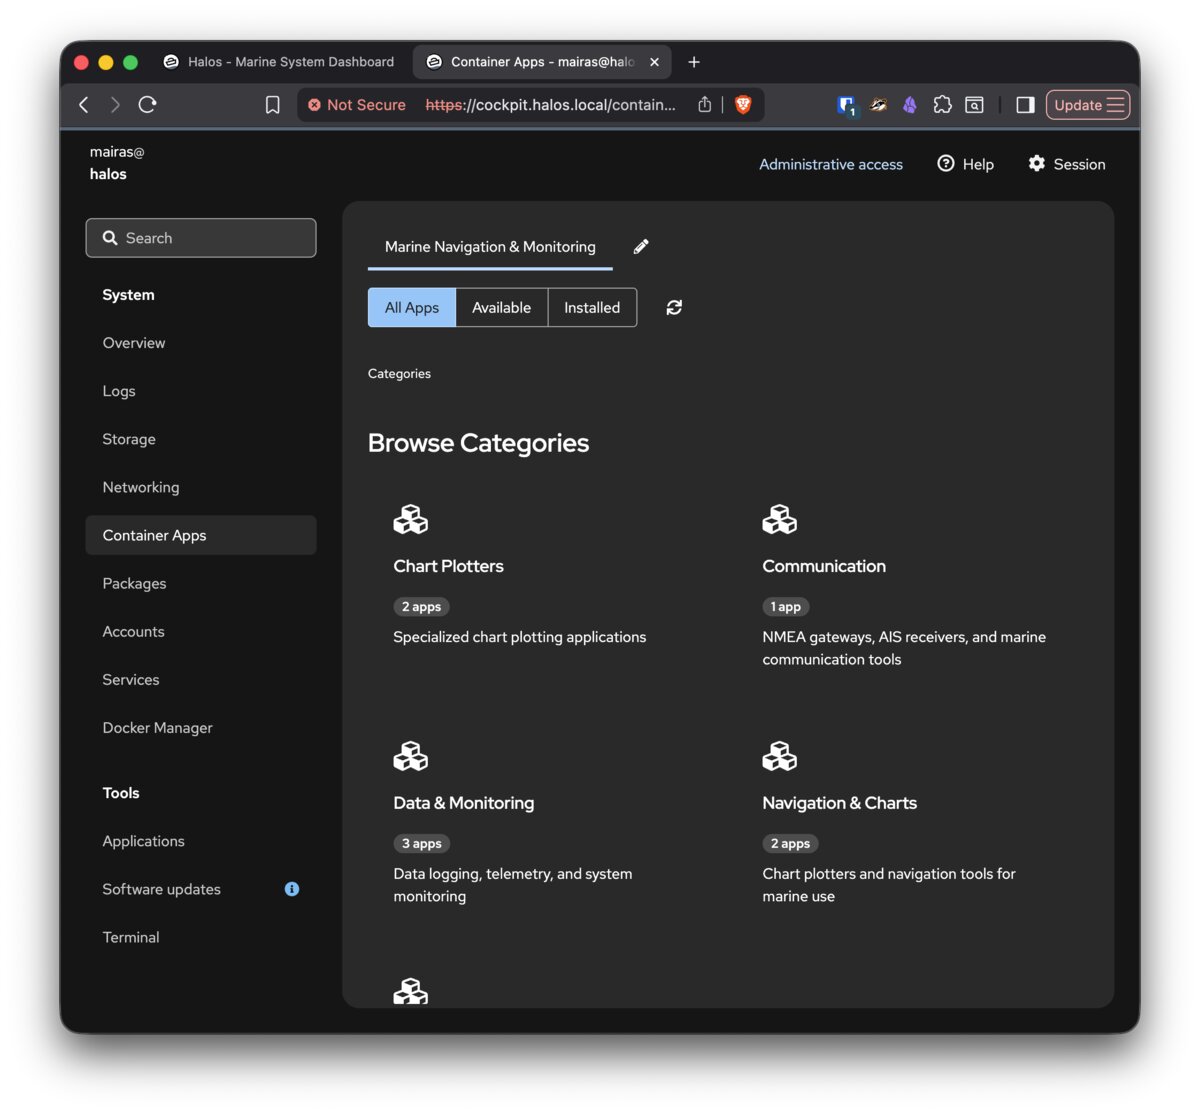
https://halos.local:9090/). - Navigate to Container Apps in the left sidebar.
- Browse by category or use the search bar to find specific apps.
The store shows apps from all configured stores. The Marine variant adds a dedicated Marine App Store with curated marine applications.
Installing an app
- Click on an app to view its details (description, version, dependencies).
- Click Install.
- The package installs quickly, but the app needs time to pull its Docker image on first start. Small apps are ready within a minute; larger ones (e.g., Grafana, OpenCPN) may take several minutes on slower connections.
- Once the image pull completes, the app appears on your Homarr dashboard and is accessible via its URL on the dashboard.
Managing installed apps
Start/Stop/Restart: Open Cockpit → Services. Find the service (named <package-name>.service) and use the controls to start, stop, or restart it.
View logs: Open Cockpit → Services → select the service → Logs tab. Or use the terminal:
Check container status: Via the Cockpit terminal:
Removing apps
Remove an app like any Debian package:
Removing a package stops the container and removes it from the dashboard. Container data volumes are preserved by default — reinstalling the app restores its data.
To remove data volumes as well:
Keeping apps updated
Container app packages are updated through the same APT mechanism as system packages:
This updates both system packages and container apps to their latest versions.
Marine Apps
The Marine variant of HaLOS includes a curated Marine App Store with applications for boat electronics, navigation, and data logging. These apps integrate with NMEA 2000, NMEA 0183, and other marine data protocols.
Overview
Install HaLOS with the Marine stack (see Choosing an Image) to get the Marine App Store. It appears alongside the standard container store in Cockpit and includes applications specifically selected for marine use.
Key marine apps available in the store:
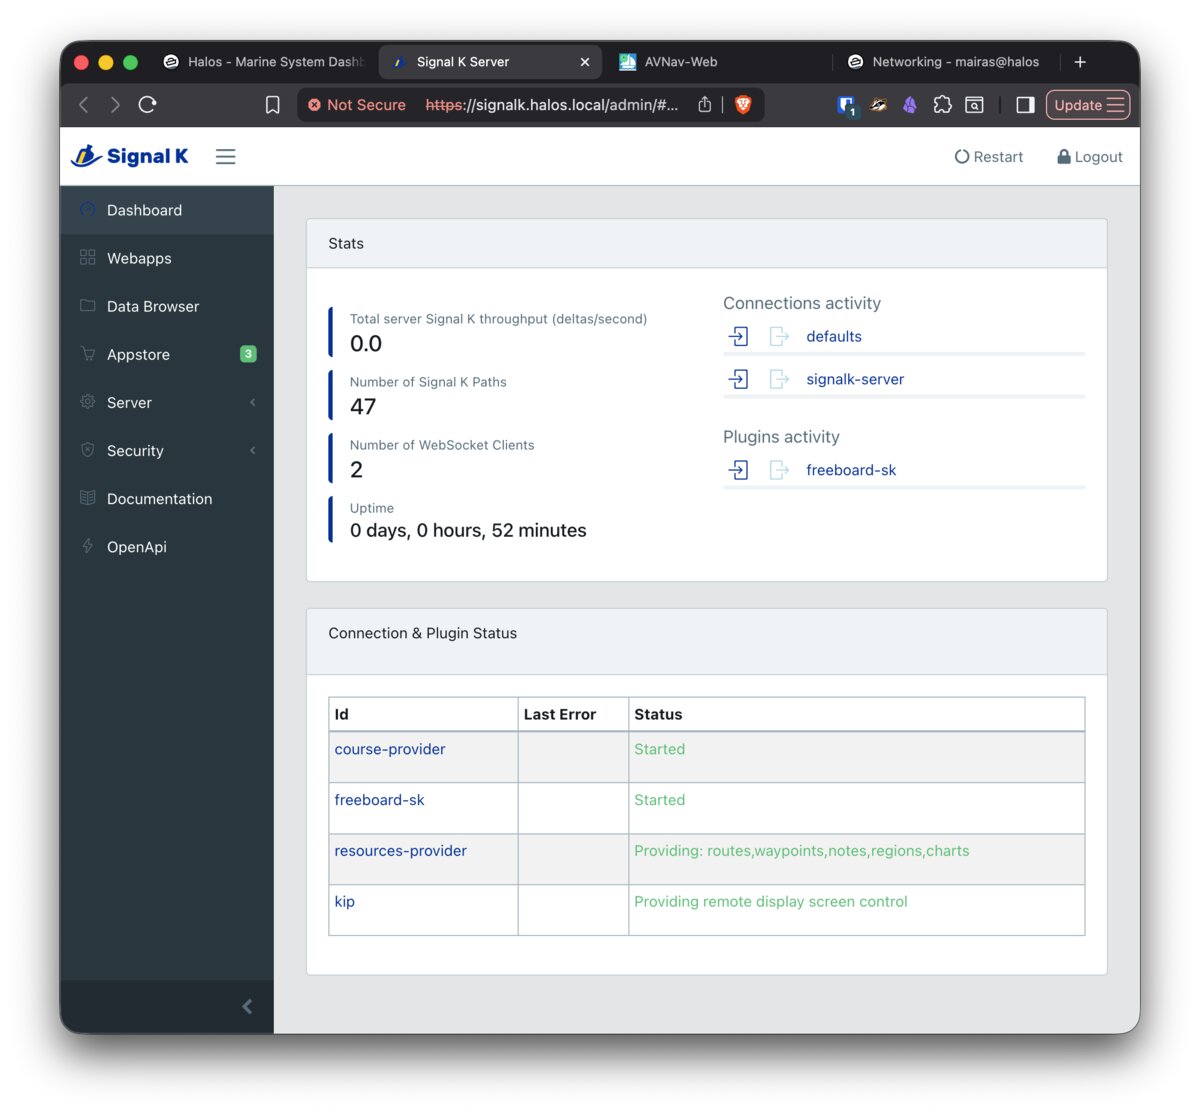
- Signal K Server — Marine data hub for NMEA 2000 and NMEA 0183
- InfluxDB — Time-series database for logging sensor data
- Grafana — Dashboards and data visualization
- AvNav — Navigation and chart plotting
- OpenCPN — Full-featured chart plotter (desktop app, also available as an experimental container)
Signal K Server
URL: https://halos.local/signalk-server/
Signal K is an open-source marine data server. It acts as a central hub for all your boat's sensor data:
- Receives data from NMEA 2000 and NMEA 0183 networks
- Provides a unified REST and WebSocket API
- Feeds data to other applications (Grafana, AvNav, OpenCPN)
- Extensible with plugins for additional data sources and integrations
Signal K is typically the first marine app to set up. Connect your NMEA data sources (via CAN bus on HALPI2, USB adapters, or network connections), and other apps can consume the data through Signal K's API.
InfluxDB
URL: https://halos.local/influxdb/
InfluxDB is a time-series database optimized for sensor data. In the marine context, it stores historical data from Signal K — wind speed, boat speed, depth, engine parameters, battery voltage, and any other metrics your instruments produce.
Default login
InfluxDB has its own login and is not behind the HaLOS single sign-on — the default admin account (admin / halos-default) is the only thing protecting it. Change the password after first boot from the InfluxDB app configuration (Cockpit → Container Apps → InfluxDB → Admin Password, 8–72 characters); HaLOS applies it to InfluxDB the next time the app starts. The admin API token is generated randomly on first boot, so Grafana and Signal K keep working without any token changes.
Use InfluxDB to:
- Record long-term trends (fuel consumption over a season, battery health)
- Store data for Grafana dashboards
- Query historical data for analysis
Grafana
URL: https://halos.local/grafana/
Grafana provides dashboards and data visualization. Connect it to InfluxDB to create custom displays for your boat data:
- Real-time gauges (speed, wind, depth)
- Historical charts (engine hours, battery voltage over time)
- Alerts (low battery, high engine temperature)
- Custom dashboards tailored to your instruments
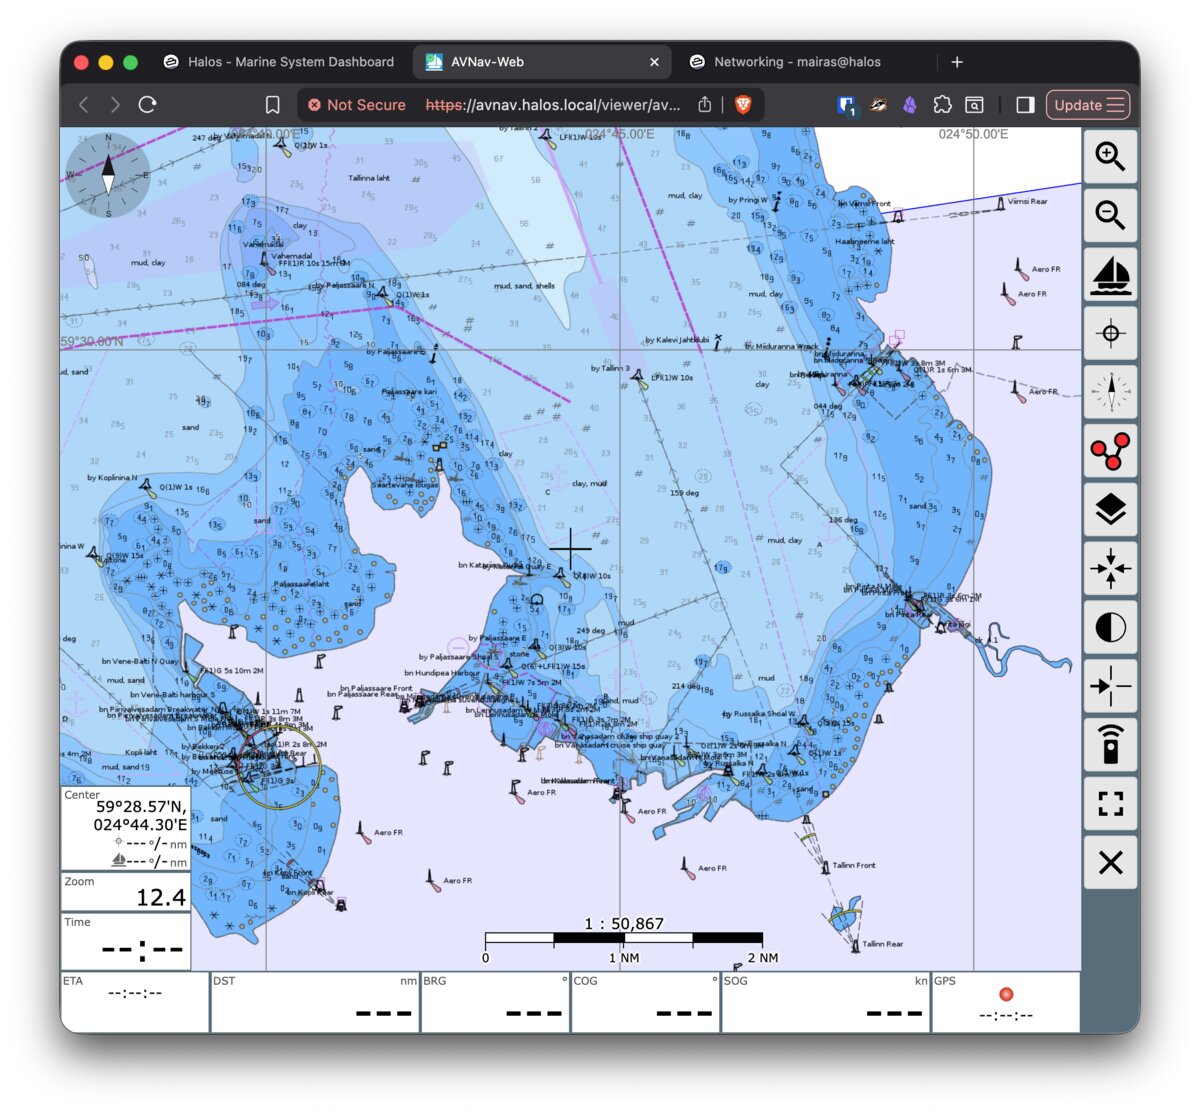
AvNav
URL: https://halos.local/avnav/
AvNav is a navigation application with chart display and route planning. It reads position and instrument data from Signal K and provides:
- Chart display with multiple chart formats
- Route planning and waypoint management
- Instrument displays (heading, speed, wind, depth)
- Anchor watch alarm
OpenCPN
OpenCPN is a full-featured chart plotter and navigation system with worldwide chart support, AIS display, weather routing, and a large plugin ecosystem.
OpenCPN is primarily a desktop application. On HaLOS Desktop images, install it natively for the best experience:
Or install it via Cockpit → Packages.
Experimental container
An experimental containerized version is available in the Marine App Store (https://halos.local/opencpn/), providing web-based remote desktop access. This is useful on headless images but is not yet production-ready.
Installing marine apps
Marine apps are installed the same way as any other container app:
- Open Cockpit → Container Apps.
- Browse the Marine App Store category or search by name.
- Click an app and select Install.
See Installing Apps for the full workflow.
Data flow
A typical marine setup chains the applications together:
- NMEA instruments send data via CAN bus (NMEA 2000) or serial (NMEA 0183)
- Signal K receives and normalizes the data
- InfluxDB stores historical records (fed by a Signal K plugin)
- Grafana visualizes the data from InfluxDB
- AvNav displays navigation data from Signal K
Migrating from an existing system
If you're moving to HaLOS from an existing marine setup (bare-metal Signal K, standalone InfluxDB, etc.), you can bring your data along. For general information about where container apps store data, see App Data and Migration.
Signal K Server
Signal K stores its configuration in ~/.signalk (typically /home/node/.signalk in Docker or ~/.signalk on bare-metal installs). The directory contains:
settings.json-- server configuration (data connections, plugins, webapp settings)plugin-config-data/-- per-plugin configurationnode_modules/-- installed pluginssecurity.json-- local user accounts and ACLs
On HaLOS, this maps to /var/lib/container-apps/marine-signalk-server-container/data/data/.
Do not copy settings.json
HaLOS generates its own settings.json with settings required for the reverse proxy (e.g., ssl: false and trustProxy: true). Overwriting it will break Traefik integration. Copy only plugin-config-data/ and, if needed, security.json.
You do not need to copy node_modules/ — Signal K will reinstall plugins automatically on the next start based on the plugin configuration.
# 1. Stop Signal K
sudo systemctl stop marine-signalk-server-container

# 2. Copy plugin config from your old system
scp -r user@old-system:/home/pi/.signalk/plugin-config-data /tmp/signalk-migration/
sudo cp -a /tmp/signalk-migration/plugin-config-data \
  /var/lib/container-apps/marine-signalk-server-container/data/data/

# 3. Fix ownership (Signal K runs as UID 1000 in the container)
sudo chown -R 1000:1000 \
  /var/lib/container-apps/marine-signalk-server-container/data/data/

# 4. Start Signal K
sudo systemctl start marine-signalk-server-container
Note
If you were using Signal K's built-in authentication on the old system, those local accounts are in security.json. On HaLOS, authentication is handled by Authelia SSO instead, so local Signal K accounts are not required. You can still copy security.json if you want to preserve them.
InfluxDB
InfluxDB 2.x stores its data in two directories:
- Configuration (
/etc/influxdb2) --influx-configs, bolt database, client settings - Database files (
/var/lib/influxdb2) -- the actual time-series data (engine, WAL)
On HaLOS, these map to:
/var/lib/container-apps/marine-influxdb-container/data/config//var/lib/container-apps/marine-influxdb-container/data/db/
From another InfluxDB 2.x instance
# 1. Stop InfluxDB
sudo systemctl stop marine-influxdb-container

# 2. Copy database files from your old system
scp -r user@old-system:/var/lib/influxdb2/* /tmp/influxdb-migration-db/
sudo cp -a /tmp/influxdb-migration-db/* \
  /var/lib/container-apps/marine-influxdb-container/data/db/

# 3. Copy configuration
scp -r user@old-system:/etc/influxdb2/* /tmp/influxdb-migration-config/
sudo cp -a /tmp/influxdb-migration-config/* \
  /var/lib/container-apps/marine-influxdb-container/data/config/

# 4. Start InfluxDB
sudo systemctl start marine-influxdb-container
Grafana
Grafana stores dashboards, data sources, users, and plugins under /var/lib/grafana. On HaLOS, this maps to /var/lib/container-apps/marine-grafana-container/data/data/.
The key file is grafana.db (SQLite database containing dashboards, users, and data source definitions).
# 1. Stop Grafana
sudo systemctl stop marine-grafana-container

# 2. Copy data from your old system
scp -r user@old-system:/var/lib/grafana/* /tmp/grafana-migration/
sudo cp -a /tmp/grafana-migration/* \
  /var/lib/container-apps/marine-grafana-container/data/data/

# 3. Fix ownership (Grafana runs as UID 472)
sudo chown -R 472:472 \
  /var/lib/container-apps/marine-grafana-container/data/data/

# 4. Start Grafana
sudo systemctl start marine-grafana-container
Note
After migration, you may need to update data source connection URLs in Grafana to match HaLOS's container networking. For example, an InfluxDB data source URL might need to change from http://localhost:8086 to http://influxdb:8086.
Note
HaLOS uses Authelia SSO for Grafana login via OIDC. After migrating, verify that SSO login works. If your old Grafana had local user accounts, they may conflict with OIDC — remove any local accounts that duplicate SSO users.
AvNav
AvNav stores charts, routes, and configuration under /var/lib/avnav. On HaLOS, this maps to /var/lib/container-apps/marine-avnav-container/data/data/.
Note
The source path below (/home/pi/avnav/data/) assumes a bare-metal Raspberry Pi install. If your old system runs AvNav in Docker, the data path will differ — check your compose file's volume mounts.
# 1. Stop AvNav
sudo systemctl stop marine-avnav-container

# 2. Copy data from your old system
scp -r user@old-system:/home/pi/avnav/data/* /tmp/avnav-migration/
sudo cp -a /tmp/avnav-migration/* \
  /var/lib/container-apps/marine-avnav-container/data/data/

# 3. Fix ownership (AvNav runs as UID 1000)
sudo chown -R 1000:1000 \
  /var/lib/container-apps/marine-avnav-container/data/data/

# 4. Start AvNav
sudo systemctl start marine-avnav-container
GPS
HaLOS Marine variants include gpsd, a GPS service daemon that provides location data to applications. gpsd multiplexes GPS data from one or more receivers to multiple clients, and is required by ubxtool for configuring u-blox GNSS receivers.
How it works
gpsd listens for GPS data from configured serial devices and USB receivers, and makes it available to clients via a TCP socket on port 2947. Applications connect to this socket using gpsd's JSON-based protocol.
By default, HaLOS Marine configures gpsd with:
- No fixed serial devices — only USB auto-detection is enabled
- USB auto-detection (
USBAUTO=true) — USB GPS receivers are detected and added automatically when plugged in
On HALPI2, gpsd is additionally configured to use the GNSS HAT serial port (/dev/ttyAMA0). Any GNSS receiver HAT on this port will work. For u-blox receivers, HaLOS auto-configures the module for marine use on every boot (10 Hz update rate, Sea dynamic model, 115200 bps). This reconfiguration is necessary because ROM-based u-blox modules (such as the MAX-M8Q) have no flash memory — settings are stored in battery-backed RAM and may be lost on power cycles. The process is transparent and adds a few seconds to gpsd startup. See the HALPI2 GNSS documentation for details.
Accessing GPS data
Signal K connects to gpsd automatically and makes position data available through its API. No additional configuration is needed.
Command-line tools are available for diagnostics:
# Monitor GPS data in real-time (JSON)
gpsmon

# Output raw NMEA sentences
gpspipe -r

# Show current fix status
gpspipe -w | head -20
Note
gpsd uses its own JSON protocol, not raw NMEA. Use gpspipe -r if you need raw NMEA 0183 sentences.
Configuration
gpsd configuration is stored in /etc/default/gpsd. To add a serial GPS device:
# Edit gpsd defaults
sudo nano /etc/default/gpsd

# Change DEVICES to include your serial port, e.g.:
# DEVICES="/dev/ttyUSB0"

# Restart gpsd
sudo systemctl restart gpsd
USB GPS receivers
USB GPS receivers are detected automatically when plugged in, thanks to the USBAUTO=true setting. No configuration is needed — gpsd will start reading data from the receiver immediately.
App Data and Migration
Every container app in HaLOS stores its persistent data on the host filesystem in a predictable location. This page explains where that data lives, how to migrate or back it up, and how to customise an app's Compose settings.
Where app data is stored
All container apps store data under:
Each app gets its own isolated directory. Data persists across container restarts and app updates. Removing an app with apt remove or apt purge preserves the data. apt purge deletes only the app's configuration in /etc/container-apps/<package-name>/; for a clean reinstall, delete /var/lib/container-apps/<package-name>/ by hand after purging.
Finding an app's data path
The package name determines the path. For any installed container app:
For example, a CasaOS app like Uptime Kuma would store data at /var/lib/container-apps/casaos-uptimekuma-container/data/.
Data paths for marine apps
| App | Package | Host path | Container path |
|---|---|---|---|
| Signal K | marine-signalk-server-container |
.../data/data/ |
/home/node/.signalk |
| InfluxDB | marine-influxdb-container |
.../data/config/ |
/etc/influxdb2 |
.../data/db/ |
/var/lib/influxdb2 |
||
| Grafana | marine-grafana-container |
.../data/data/ |
/var/lib/grafana |
| AvNav | marine-avnav-container |
.../data/data/ |
/var/lib/avnav |
| OpenCPN | marine-opencpn-container |
.../data/config/ |
/config |
All paths above are relative to /var/lib/container-apps/<package-name>/. For example, Signal K data lives at /var/lib/container-apps/marine-signalk-server-container/data/data/.
Data paths for core containers
| Component | Host path | Contents |
|---|---|---|
| Authelia | .../data/authelia/ |
users_database.yml, OIDC config, session data |
| Homarr | .../data/homarr/data/ |
Dashboard boards, settings |
| Traefik | .../data/traefik/certs/ |
TLS certificates, ACME data (acme.json) |
All paths above are relative to /var/lib/container-apps/halos-core-containers/.
Migrating data from another system
The general procedure for migrating any app's data to HaLOS:
- Install the app on HaLOS (so the directory structure and systemd service exist).
- Stop the app's service.
- Copy your data files to the correct host path.
- Fix file ownership if needed (some containers run as non-root users).
- Start the service.
Warning
Always stop the container before copying data. Writing to the data directory while the container is running can corrupt data.
# General pattern
sudo systemctl stop <package-name>
scp -r user@old-system:/path/to/app/data/* /tmp/app-migration/
sudo cp -a /tmp/app-migration/* /var/lib/container-apps/<package-name>/data/<subdir>/
sudo chown -R <uid>:<gid> /var/lib/container-apps/<package-name>/data/<subdir>/
sudo systemctl start <package-name>
The container's UID/GID can be found in its docker-compose.yml and prestart.sh. Look for the user: field in the compose file or chown commands in prestart.sh.
For step-by-step migration guides for marine apps (Signal K, InfluxDB, Grafana, AvNav), see Marine Apps — Migrating from an existing system.
Backing up app data
The simplest backup approach is to copy the container data directory:
# Back up all app data
sudo tar czf halos-app-data-$(date +%Y%m%d).tar.gz \
  /var/lib/container-apps/

# Back up a single app
sudo tar czf signalk-backup-$(date +%Y%m%d).tar.gz \
  /var/lib/container-apps/marine-signalk-server-container/
For a consistent backup, stop the app before backing up its data.
Restoring from backup
Warning
Restoring overwrites the app's existing data. If you need to preserve current data, back it up first.
# Stop the app
sudo systemctl stop <package-name>

# Restore
sudo tar xzf backup.tar.gz -C /

# Start the app
sudo systemctl start <package-name>
Customising an app with compose.d
Each container app is defined by a docker-compose.yml in /var/lib/container-apps/<package-name>/. Do not edit that file: the next package upgrade overwrites it. To change an app's Compose settings, put your own Compose file in the app's compose.d/ directory:
Files ending in .yml or .yaml are applied in byte order of filename, after docker-compose.yml and, for apps with a web address, after the generated routing labels. A file in compose.d/ can therefore override any setting of the app. Package upgrades and apt purge leave these files in place.
The files merge with the app's definition by Docker Compose's merge rules. Lists such as group_add add to the existing entries. To clear a setting, tag it with !reset; to replace it entirely, tag it with !override. HaLOS ships Compose 2.26, which supports both.
Example: adding a supplementary group
To give the process in one of the app's services an extra group, create for example compose.d/10-groups.yml:
<service> is the service name from the app's docker-compose.yml. Use the numeric group ID from the host (getent group <group> shows it); a group name is looked up inside the container, where it may not exist.
Relative paths in a compose.d/ file resolve against the app directory, /var/lib/container-apps/<package-name>/. A top-level name: in a compose.d/ file has no effect, because the service sets the project name itself.
Applying the change
Changes take effect when the app restarts. Check the result first, then restart:
compose check validates the app's Compose configuration with the same environment the service uses, and lists the active compose.d/ files. Part of that environment is generated when the service starts, so run the check while the app is running or after it has started at least once since boot. It needs sudo because the app's runtime.env is readable only by root.
If a compose.d/ file makes the configuration invalid, the app does not start. See App fails to start after adding a compose.d file.
Migrating from OpenPlotter
This guide moves your data from an existing OpenPlotter (Raspberry Pi OS) system to a fresh marine HaLOS install on the same device, using an external USB stick to carry the data across the reflash. Two scripts do the work: one backs up your data on OpenPlotter, the other restores it on HaLOS. If you'd rather move the data by hand, Data locations at the end of this guide maps every source path to its place on HaLOS.
The scripts migrate four things, and nothing else:
- Signal K — server configuration, plugins, users, and charts
- InfluxDB — your full history of logged sensor data
- Grafana — datasources and (where possible) dashboards
- OpenCPN — configuration and plugin data
Back up more than just these four before you reflash
Installing HaLOS wipes the disk, and the wipe is irreversible. The backup script copies only the four domains above — everything else is left behind: personal files, charts stored outside ~/.opencpn, custom /etc configuration, and any apps you installed yourself. Copy anything else you care about to the stick before you reflash. Until the restore succeeds, that stick is the only copy of your data.
Before you start
- A USB stick large enough for your data. InfluxDB history is usually the biggest part and can run to tens of gigabytes. The backup script measures your data and refuses to start if the stick is too small, so a 64 GB stick is a safe choice. Format it as exFAT or ext4 if your InfluxDB data exceeds 4 GB (FAT32 cannot hold files that large).
- Both devices online. The scripts are downloaded over the network on each device.
- Run as your normal user (for example
pi). The scripts usesudoonly where they need to.
Step 1 — Back up on OpenPlotter
On the running OpenPlotter system, plug in the USB stick, then download and run the backup script:
The script stops Signal K, InfluxDB and Grafana for a consistent copy (and asks you to close OpenCPN), copies each part to the stick, and verifies the result. When the migration backup is complete and verified it prints:
========================================
  MIGRATION BACKUP COMPLETE AND VERIFIED
========================================
followed by a reminder that this covers only the four migrated domains. If you do not see that banner, the backup is incomplete — re-run the script and resolve any error it reports. Remember the banner confirms only the migration backup; copy anything else you need (see the danger note above) before you reflash.
Keep the stick safe
Leave the USB stick plugged in, or set it aside somewhere safe. It is your only copy of the data until the restore on HaLOS succeeds. It also contains credentials (Signal K user accounts, Grafana and InfluxDB secrets), so don't hand it around — and wipe it once the migration is done.
Step 2 — Flash HaLOS
Flash the Marine HaLOS image onto the device as usual. See Choosing an Image and Quick Start. Do not reuse or wipe the USB stick.
Step 3 — Restore on HaLOS
Boot the freshly-flashed HaLOS device, plug in the same USB stick, then download and run the restore script:
The script finds the backup on the stick, checks it is complete, and restores each part. For InfluxDB it installs the marine InfluxDB app if needed, swaps in your data, and renames your telemetry bucket to marine so HaLOS' built-in dashboards and datasource work against your history. If your old system had more than one data bucket, it asks which one is your main telemetry bucket.
When it finishes it prints a summary of what was restored.
What is migrated, and what is not
| Migrated | Not migrated |
|---|---|
| Signal K configuration and data | Other home-directory files |
| InfluxDB history (all buckets) | System configuration under /etc |
| Grafana datasources and dashboards | Docker apps you installed yourself |
| OpenCPN config and plugin data | Charts stored outside ~/.opencpn |
After migrating
- Signal K logging into InfluxDB. Your telemetry bucket is renamed to
marine. HaLOS configures the Signal K → InfluxDB plugin for themarinebucket automatically, but if your old setup used a custom bucket name, open the Signal K admin UI and confirm the InfluxDB plugin is writing tomarineso new data continues to be logged. - Grafana dashboards. Your historical data is always available through HaLOS' built-in marine dashboards. Importing your own dashboards is best-effort and depends on the Grafana version your OpenPlotter system ran; if they do not appear, recreate them or use the built-in ones.
- OpenCPN charts. Charts you stored in a custom folder (outside
~/.opencpn) are not copied automatically. The backup script warns you about these — copy them to the stick and into place manually.
Rolling back
Before swapping in your data, the restore script moves the fresh HaLOS defaults aside to *.halos-default (for example …/data/db.halos-default). If a restore goes wrong, those let you return to the clean state.
Troubleshooting
- "Backup is marked incomplete" — the backup did not finish. Re-run
openplotter-backup.shon the source system until it printsMIGRATION BACKUP COMPLETE AND VERIFIED. - A restore failed partway — fix the problem it reported and run
halos-restore.shagain; it re-extracts everything from the stick, and the*.halos-defaultcopies from the first run are kept as the rollback state. - InfluxDB does not become healthy on restore — InfluxDB could not open the restored data (a damaged copy, for example). The restore leaves the fresh HaLOS state at
…/data/db.halos-default. Checksudo journalctl -u marine-influxdb-container.service -e. - No completion banner and the stick is full — use a larger stick; the backup needs room for your whole InfluxDB history.
Data locations
The scripts above handle these paths for you. This section is a reference for anyone moving the data by hand. On OpenPlotter each service keeps its data in the standard location used by its Debian package, so these paths apply equally to most plain Raspberry Pi OS setups that installed Signal K, InfluxDB, Grafana or OpenCPN from apt. On HaLOS the same services run as containers, so their data lives under /var/lib/container-apps/<app>/data/.
| Data | OpenPlotter / Raspberry Pi OS | HaLOS |
|---|---|---|
| Signal K | ~/.signalk |
/var/lib/container-apps/marine-signalk-server-container/data/data |
| InfluxDB 2 | /var/lib/influxdb (bolt at /var/lib/influxdb/influxd.bolt, engine at /var/lib/influxdb/engine) |
/var/lib/container-apps/marine-influxdb-container/data/db |
| Grafana | /var/lib/grafana/grafana.db |
/var/lib/container-apps/marine-grafana-container/data/data/grafana.db |
| OpenCPN | ~/.opencpn, ~/.local/share/opencpn |
same paths in your HaLOS home directory |
One detail worth knowing:
- OpenCPN stays in the home directory. Its config and plugin data restore to the same
~/.opencpnand~/.local/share/opencpnpaths on HaLOS.
Networking
HaLOS uses NetworkManager for network configuration, with Cockpit providing a web-based interface for managing connections.
WiFi
WiFi on Desktop images
If you're using a Desktop image with a monitor, keyboard, and mouse, connect to WiFi using the NetworkManager applet in the desktop top panel (right edge of the screen). Select a network, enter the password, and you're connected — just like any desktop Linux system.
WiFi on headless images
Headless images have no desktop environment, so WiFi must be configured through Cockpit or the command line. All headless images include a built-in WiFi access point for initial setup without Ethernet.
WiFi through Cockpit
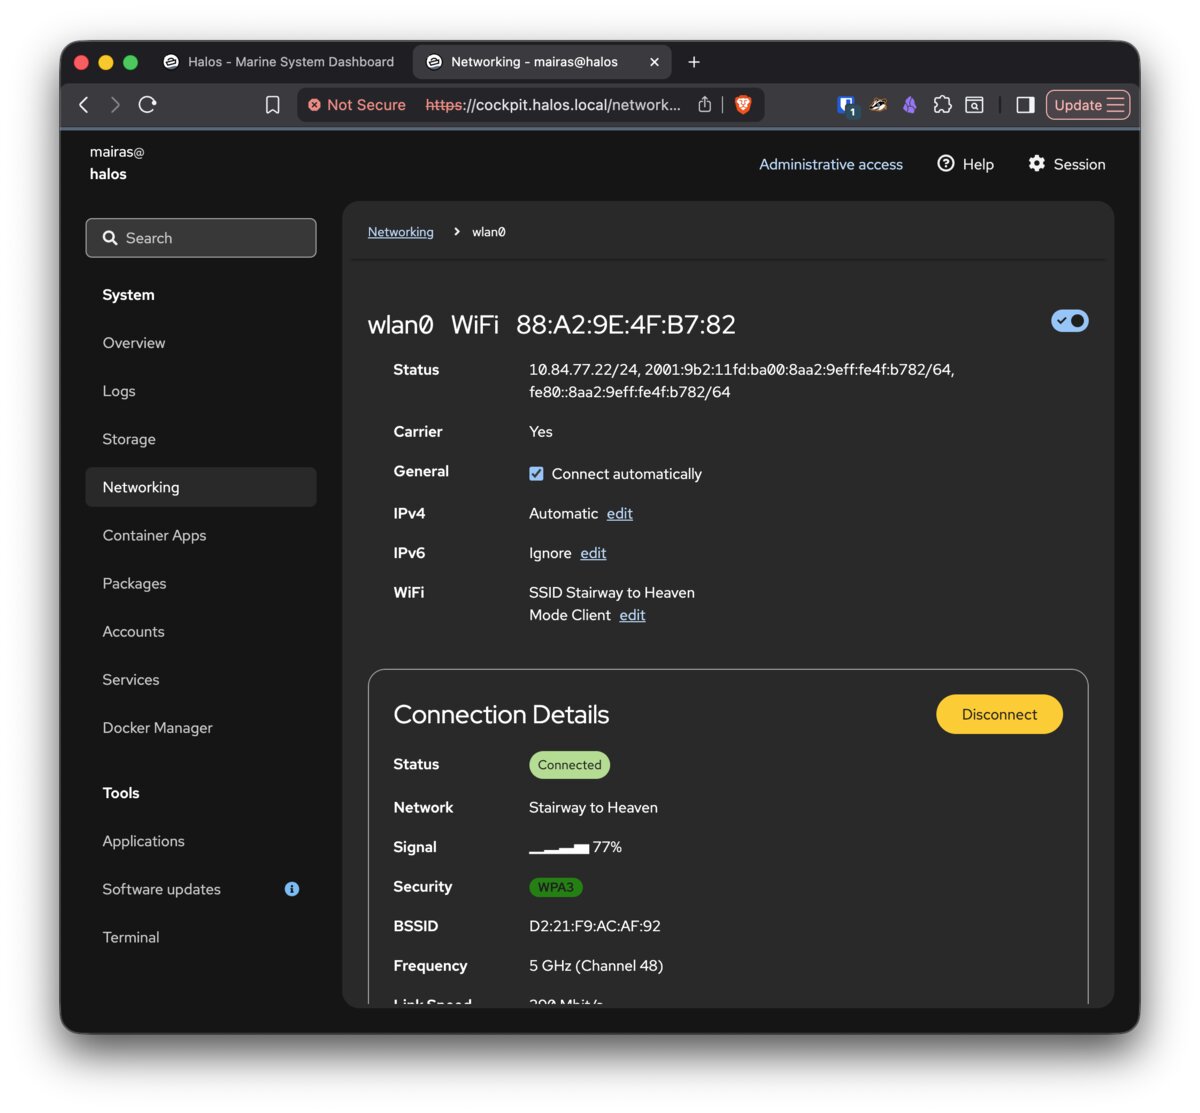
On any image, you can configure WiFi through the Cockpit NetworkManager module:
- Open Cockpit → Networking.
- Click WiFi (wlan0).
- Wait for the list of available networks to appear.
- Click your network.
- Enter the password and click Add.
Access point mode
All headless images and the Halos-Desktop-Marine-HALPI2-AP desktop variant create a WiFi access point on first boot:
- Network name:
Halos-XXXX(XXXX is unique to your device) - Password:
halos1234
This lets you reach the device without Ethernet. The hotspot has no internet of its own, so connect to it and open Cockpit at https://halos.local:9090/, then configure a WiFi client connection through Cockpit → Networking.
When the device joins a WiFi network, it keeps the hotspot running and acts as a client at the same time (concurrent AP and client). To do this it moves the hotspot onto the client network's channel, so a device connected to the hotspot may briefly disconnect and reconnect on its own. For the full first-time walkthrough, see First Boot — WiFi access point.
Serving more access point clients
The WiFi chip (Cypress CYW43455) has two firmware variants, and the system chooses between them with update-alternatives. The default standard variant accepts about 7 access point clients. The minimal variant is tuned for access point use and accepts about 19.
Use the minimal variant on any device whose hotspot is in real use. The client count is the smaller reason: in practice the standard variant seizes up with only a few clients connected, and then admits none at all.
Switch the variant:
Select the cyfmac43455-sdio-minimal.bin entry, then reboot. update-alternatives records the choice, so later firmware package updates keep it.
The minimal variant frees the chip memory for those extra client slots by dropping features:
- Automatic channel selection.
- DFS radar detection, so the 5 GHz channels that require it become unavailable.
- 802.11k/v/r roaming assistance and antenna diversity.
It is also an older firmware release than the standard variant (7.45.241 from 2021, against 7.45.265 from 2023).
If the hotspot does not come up after the switch, set a fixed channel on it, because the minimal variant cannot pick one on its own:
To go back to the default firmware, run the same command and select the standard entry, or run sudo update-alternatives --auto cyfmac43455-sdio.bin.
Ethernet
Ethernet works out of the box with DHCP. The device obtains an IP address automatically from your network's DHCP server.
To configure a static IP:
- Open Cockpit → Networking.
- Click on the Ethernet interface.
- Switch from "Automatic (DHCP)" to "Manual".
- Enter the desired IP address, netmask, gateway, and DNS servers.
Hostname and mDNS
HaLOS uses mDNS (multicast DNS) for local hostname resolution. The default hostname is halos, making the device reachable at halos.local.
Apps are accessed via path redirects on the base hostname (e.g., halos.local/grafana/), which redirect to dedicated HTTPS ports. Previously, per-app subdomains were advertised via mDNS (e.g., grafana.halos.local), but this was removed because Windows doesn't support multi-label .local mDNS names.
Changing the hostname
If you change the device hostname (via Cockpit → Overview or hostnamectl), all URLs change accordingly. A device named myboat uses:
https://myboat.local/— Dashboardhttps://myboat.local/grafana/— Grafanahttps://myboat.local:9090/— Cockpit direct access
After changing the hostname:
- The old
.localname stops resolving. Update your bookmarks. - TLS certificates are regenerated on next service restart to cover the new hostname.
Multiple interfaces on the same network
Connecting the device to one network over both Ethernet and WiFi usually works fine. In some cases, though, Avahi may register the hostname on more than one interface and rename it (e.g. to halos-2.local), leaving halos.local unresolvable. If you hit that, keep a single interface on a given network or put them on different networks. See Troubleshooting — Device disappears or shows up as halos-2.local.
Reaching the device from outside the LAN
mDNS only works on the LAN. For VPN or other off-LAN access, see Remote Access.
Troubleshooting network issues
mDNS not resolving: Some networks or client devices have issues with .local resolution. Try accessing by IP address instead. Check your router's DHCP client list for the device's IP.
WiFi won't connect: Verify credentials through Cockpit NetworkManager. Check Cockpit → Logs for NetworkManager entries. As a fallback, use Ethernet and configure WiFi from the wired connection.
Remote Access
To reach HaLOS from outside the LAN, the device's canonical hostname must resolve from the remote network. The shipped default ${hostname}.local is mDNS-only. Don't try to alias it to a routable IP: .local is reserved for mDNS, operating systems handle it through special resolution paths (macOS via mDNSResponder, Linux typically via NSS plus systemd-resolved's built-in mDNS), and whether a hosts-file or DNS-server override "wins" varies by platform, browser, and resolver configuration.
Enabling remote access has two parts:
- Change the canonical from
${hostname}.localto a fully-qualified domain name (FQDN, a name with at least one dot in it, likehalos.example) that resolves on your LAN. The canonical is the first line of/etc/halos/hostnames.conf. - Make the same FQDN resolve from the remote network.
You'll also need a VPN connecting the remote network to the device's LAN. Configuring the VPN itself is out of scope for this page.
Step 1: Set an FQDN as the canonical
The new FQDN must already resolve on your LAN to the device's LAN IP, otherwise on-LAN clients break too. Two ways to get there, depending on whether your router already publishes a name for the device.
If your router already serves a name for the device
Many home and SOHO routers automatically create a DNS entry for every device that takes a DHCP lease, combining the device's hostname with a domain suffix the router advertises (e.g., halos.home, halos.lan, or halos.<something>). Routers running dnsmasq do this out of the box, which covers OpenWrt, OPNsense, pfSense, Pi-hole used as the DHCP+DNS server, and many consumer routers.
Test from a LAN client that isn't the HaLOS device itself:
nslookup halos.<your-domain>
If that returns the device's LAN IP, you already have an FQDN that works. Tell HaLOS to use it as the canonical by editing /etc/halos/hostnames.conf and putting the special ${fqdn} token on the first line:
${fqdn}
${hostname}.local
${fqdn} expands at service start to <device-hostname>.<dhcp-domain>, which is the same name your router publishes. Using the token (rather than hard-coding the name) means the canonical tracks the device automatically if the hostname or DHCP domain changes.
If you need to add the name yourself
If the nslookup above didn't work — your router doesn't auto-register DHCP leases, or the DHCP domain isn't a name you'd want as the canonical (.lan, .home, an ISP-pushed default) — add a DNS record yourself on whatever serves DNS on your LAN. Pick a name like halos.example, point it at the HaLOS device's LAN IP, and reserve that IP in DHCP so it doesn't move.
Then edit /etc/halos/hostnames.conf and put the chosen name on the first line:
halos.example
${hostname}.local
Restart and verify
In both cases, keep ${hostname}.local in the list — typing halos.local in a browser still works on the LAN via mDNS, but the canonical (the OIDC issuer URL) is now the FQDN.
Restart and verify:
sudo systemctl restart halos-core-containers.service
journalctl -u halos-core-containers.service -n 30 --no-pager | grep -i domain
Expect a Domain: <your-fqdn> line. From a LAN client, confirm that browsing to https://<your-fqdn>/ works end-to-end, including clicking Login and returning to the dashboard.
Step 2: Make the FQDN resolve on remote clients
On the remote device, add an override mapping the FQDN to whatever IP that device can route to the HaLOS device through. How you do this varies by platform.
Desktop hosts file
Add a line to the hosts file pointing at the VPN-reachable IP:
10.7.0.42 halos.example
Locations and admin requirements per OS:
- macOS / Linux:
/etc/hosts. Edit withsudo. - Windows:
C:\Windows\System32\drivers\etc\hosts. Edit with an editor opened as Administrator (otherwise saves fail silently).
Works the same on all three because the name isn't .local.
Mobile
Stock iOS and Android don't expose a hosts file without jailbreak or root. Use either VPN-side DNS (next section) or an on-device DNS-filter app (AdGuard, NextDNS, Personal DNS Filter) configured with the host override.
Using Tailscale as the VPN
Tailscale gives you a tunnel between the HaLOS device and your personal devices without running your own VPN server. Install it on both ends; the HaLOS device gets a tailnet IP that you put in the hosts-file override above. Get it from tailscale status:
Point the override at that tailnet IP. The canonical stays your chosen FQDN, and only your tailnet-connected devices use the override. On-LAN clients aren't affected.
Routing the FQDN via the LAN DNS server
Most VPNs can route specific DNS queries through the tunnel to a server on the LAN side. This works for host-to-site VPN (one client back to a LAN) and site-to-site VPN (two networks linked) alike: the LAN's DNS server answers for remote clients too, reached through the tunnel. No per-device overrides to maintain.
The pattern is split-DNS: only queries for your chosen domain go to the LAN DNS server, and everything else uses the client's normal resolver. Each VPN exposes it differently.
-
WireGuard. The
DNS =line in the client config sets the interface's nameserver and search domain. Split-DNS itself (routing only specific suffixes through the WireGuard nameserver) is handled by the client OS's resolver, not wg-quick directly. On Linux with systemd-resolved, the common approach is aPostUphook:[Interface] DNS = 192.168.1.1 PostUp = resolvectl domain %i ~example PostDown = resolvectl revert %i~examplemarksexampleas a routing-only domain for the interface; queries ending in.examplego to192.168.1.1, everything else uses the system's normal resolver. The official WireGuard GUI clients on macOS and Windows handle DNS configuration in their own settings panels and don't always expose split-DNS routing. -
OpenVPN. Pushing a DNS server with
push "dhcp-option DNS <ip>"causes the client to use that server for all queries while connected. True split-DNS (only routing specific suffixes) needspush "dhcp-option DOMAIN-ROUTE <suffix>"on OpenVPN 2.5+ with a client that respects it (Linux with systemd-resolved does; not all GUI clients do). -
Tailscale. Configure Split DNS in the admin console's DNS settings. Add the LAN DNS server's IP and the domain it should handle (e.g.,
example); the tailnet routes queries for that suffix to the specified server. The LAN DNS server has to be reachable from the tailnet, which means either running Tailscale on it as well, or advertising a subnet route from another tailnet member (typically the HaLOS device, withsudo tailscale up --advertise-routes=192.168.1.0/24plus an approval in the admin console).
You don't need a separate VPN-side view of the DNS. The LAN's answer (the device's LAN IP) works for remote clients because the VPN routes them to that IP.
Hostname-choice guidance
Avoid:
.lan,.home,.localnetand other widely-used informal defaults. Many consumer routers ship with one of these as their DHCP option-15 domain. When two networks both call themselves.lan, anything bridging them or any client cache crossing the boundary gets ambiguous resolution.- Real TLDs you don't own.
.boat,.dev, and other registered TLDs invite collisions with public DNS. .localfor anything other than its mDNS-default role.
What to use:
- A clearly-made-up suffix you've picked for your site (
halos.example,halos.boat-name,halos.hurma). Simplest option; just needs to be a name your LAN DNS server is willing to serve. .home.arpa. RFC 8375 reserves this suffix for private home-network use, so it won't collide with public DNS.- A subdomain of a domain you actually own (
halos.matti.example.com). Best fit if your setup involves real public DNS infrastructure.
Gotchas
DNS-over-HTTPS bypassing your resolver
Modern browsers (Firefox by default, Chrome and Edge optionally) can ship queries directly to a public DoH resolver, bypassing the operating system's resolver entirely. Your LAN DNS or VPN-pushed DNS isn't consulted, and the canonical returns NXDOMAIN.
Symptoms: nslookup from the same machine returns the right IP, but the browser fails to load the page.
Fix: disable DoH in the browser, or set the bypass list to include your canonical's domain.
- Firefox: Settings → Privacy & Security → DNS over HTTPS → Off.
- Chrome / Edge: chrome://settings/security → Use secure DNS → Off, or "With your current service provider."
mDNS does not cross tunnels
Don't try to make halos.local work over a VPN by reflecting mDNS across the tunnel. Multicast across tunnels scales poorly and creates resolution loops. Switching the canonical to an FQDN avoids this.
Reverting
To go back to the shipped default, edit /etc/halos/hostnames.conf and put ${hostname}.local back on the first line:
${hostname}.local
<any other registered hostnames>
Restart:
Active sessions tied to the previous canonical become invalid. Users log in once.
See also
- Networking. Base hostname configuration, mDNS, access point mode.
- Single Sign-On. How OIDC, Authelia, and Traefik fit together.
- Trust the device. Installing the device's CA so TLS validates without warnings.
Troubleshooting
Common issues and how to resolve them.
Can't access the web interface
Symptom: Browser can't reach https://halos.local/.
Possible causes and solutions:
-
No internet on first boot: Container images are downloaded on first boot. Without internet, only Cockpit on port 9090 works. Connect via Ethernet or use the AP image to configure WiFi first — see First Boot.
-
Not enough time: Core containers take 2–3 minutes to download and start after boot. Wait and try again.
-
Hostname not resolving: mDNS (
.local) resolution depends on your client device and network. Try:- Accessing by IP address instead (check your router's DHCP client list)
- Using a different device or browser
- On Windows, ensure the Bonjour service is running
-
Not on the same network: Your device must be on the same local network as the Raspberry Pi. If using WiFi, ensure you're connected to the right network.
-
Try Cockpit directly: Cockpit runs independently on port 9090 and doesn't depend on Traefik or Authelia. Try
https://halos.local:9090/— if this works, the issue is with the reverse proxy containers.
Certificate warnings
Symptom: Browser shows a security warning when accessing any HaLOS URL.
This is expected behavior. HaLOS uses self-signed certificates because automatic certificates (Let's Encrypt) aren't possible on local .local networks.
Accept the certificate warning for each port as you encounter it — the same certificate covers all ports, but browsers treat each port as a separate origin.
See First Boot — Certificate warning for browser-specific instructions.
Browser refuses to load the device after re-flashing
Symptom: After re-flashing the device, your browser shows a TLS error (e.g. NET::ERR_CERT_AUTHORITY_INVALID) and no "Proceed anyway" link is offered. The page mentions HSTS — for example, "You cannot visit halosdev.local right now because the website uses HSTS."
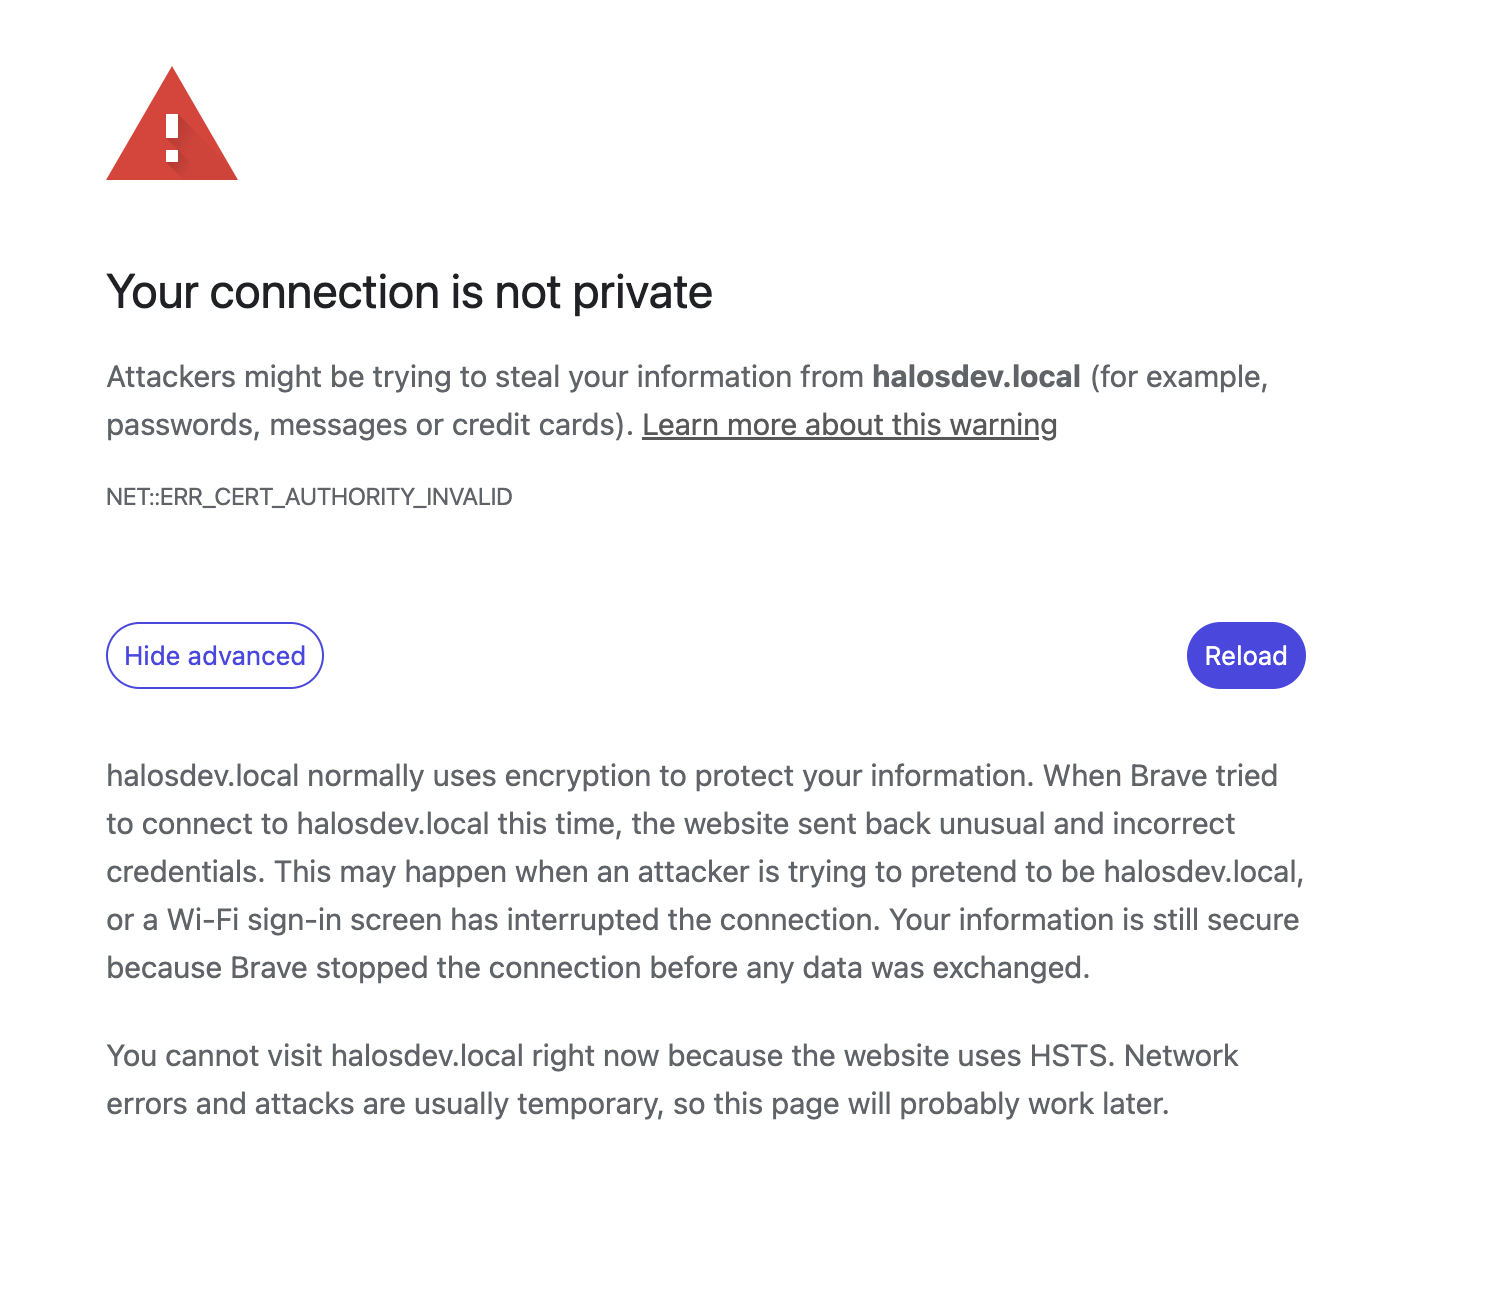
Cause: One of the apps behind the device proxy (Signal K Server in particular) used to emit a Strict-Transport-Security header on every response. As soon as your browser visited any per-app port — for example when you opened a Signal K plugin from the dashboard — Chromium-family browsers cached that HSTS state for the whole halosdev.local host (including subdomains) for a year. From then on, any TLS error on the host became non-overridable: no "Proceed anyway" link, only the thisisunsafe keystroke.
Re-flashing the device makes the symptom visible because the regenerated leaf certificate trips the HSTS-locked error, but the underlying cause is the cached HSTS pin from the earlier visit, not the cert rotation itself.
Already fixed on current HaLOS versions
HaLOS now strips Strict-Transport-Security at the Traefik proxy before responses reach the browser, so devices running an up-to-date halos-core-containers package will not establish new HSTS state. If you upgraded an existing device and have HSTS pinned from a previous visit, you still need to clear it once using the steps below — but the lockout will not recur.
Solution — clear the HSTS pin for the hostname:
- Open
chrome://net-internals/#hsts(Brave:brave://net-internals/#hsts, Edge:edge://net-internals/#hsts). - Scroll to Delete domain security policies.
- Enter the device hostname (e.g.
halos.local) and click Delete. - Reload the page — you'll get the normal "Not secure" warning, which you can now click through.
Firefox doesn't ship with HSTS preloaded for .local hostnames and typically isn't affected. If it is, clear the site-specific settings via Preferences → Privacy & Security → Cookies and Site Data → Manage Data, remove the entry for your device, and restart Firefox.
Quit Safari, then remove the cached HSTS entry: rm ~/Library/Cookies/HSTS.plist and reopen Safari.
If you previously installed the device's CA on your workstation, the old CA is now stale and should be removed before installing the new one — see Trust the device → Removing the trust anchor.
Container app store is empty
Symptom: The Container Apps section in Cockpit shows no applications.
Solution: Run a system update first:
This downloads the latest package lists from the Hat Labs repository. After updating, the container store should show available apps.
App not showing on the dashboard
Symptom: You installed an app but it doesn't appear on the Homarr dashboard.
Check these in order:
-
Is the container running? Check via Cockpit → Services or:
-
Wait for the adapter: The
homarr-container-adaptersyncs containers to the dashboard periodically. Give it a minute after install. -
Check adapter logs:
-
Restart the adapter:
WiFi not connecting
Symptom: Can't connect to a WiFi network through Cockpit.
- Open Cockpit → Networking and check the WiFi interface status.
- Verify the WiFi credentials are correct.
- Check Cockpit → Logs for NetworkManager errors.
- If using an AP image, the device may be in AP mode. Switch to client mode through Cockpit NetworkManager.
- As a fallback, connect via Ethernet and configure WiFi from the wired connection.
SSH access
Headless images: SSH is enabled by default. Connect with:
Default password: halos
Desktop images: SSH is disabled by default. Enable it via the Cockpit terminal or by connecting a keyboard and monitor:
Changed hostname, can't connect
Symptom: After changing the hostname, halos.local no longer works.
The old .local hostname stops resolving once the hostname is changed. Use the new hostname instead:
If you've forgotten the new hostname, find the device by:
- Checking your router's DHCP client list for the device's IP address
- Connecting a monitor and keyboard to see the login prompt (which shows the hostname)
- Scanning the network:
ping -c1 halos.local(if you haven't changed it) or use a network scanner
Device disappears or shows up as halos-2.local
Symptom: halos.local stops resolving, or the device shows up under a numbered name like halos-2.local. This may happen when the device is connected to the same network over both Ethernet and WiFi.
Cause: With more than one interface on the same network, Avahi can register the hostname on each interface separately. The later registration finds the name already taken and falls back to a numbered variant (halos-2.local). If the interface holding the plain halos.local name is then disabled, only the numbered name is left advertised.
Solution: Keep a single interface on a given network — disconnect one, or put the interfaces on different networks. Then restart Avahi (or reboot) so the plain hostname re-registers:
Note
This is mDNS behaviour on multi-homed hosts, not a HaLOS bug. Both interfaces on one network usually works fine; the rename only shows up in corner cases.
HALPI2 drops to initramfs on CM5 eMMC
Symptom: After flashing a HALPI2 image to a Compute Module 5's eMMC, the system drops to an initramfs BusyBox prompt instead of booting normally. The same image works fine when flashed to an NVMe SSD.
Cause: HALPI2 images disable the SD card interface (dtparam=sd=off in config.txt) to avoid a known shutdown delay. On CM5, the eMMC uses the same controller, so disabling it prevents the kernel from finding the root filesystem.
Solution: After flashing and before booting, mount the boot partition on your computer and edit config.txt:
- Find the line
dtparam=sd=off(near the end of the file). - Comment it out by adding a
#prefix: - Save, unmount, and boot.
Note
This only affects CM5 eMMC. HALPI2 units with NVMe SSDs are not affected.
Containers not starting
Symptom: Services show as failed or containers aren't running.
-
Check the service status:
-
Check the container state and logs (container apps log to the journal):
-
Check disk space — containers need room for images:
-
Check if Docker is running:
App fails to start after adding a compose.d file
Symptom: After you add or change a file in an app's compose.d/ directory, the app's service fails to start.
Cause: The service validates the app's Compose configuration, including every compose.d/ file, before it starts the containers. An invalid file fails the start.
Solution:
-
Find the error in the service log:
Acompose.d fragments: ...line lists the active files, followed by Compose's error. The error names the service or the YAML line but not the file, so check each listed file. -
Fix or remove the file, then check the configuration:
-
Clear the failed state and start the service:
See Customising an app with compose.d for how these files are applied.
Getting help
- GitHub Discussions — Ask questions and share ideas with the community
- GitHub Issues — Report bugs or request features
Architecture
Architecture Overview
How HaLOS is structured, from the base OS to the application layer.
Design Principles
HaLOS follows a set of core design principles:
- Container-first: Applications run as Docker containers, managed as standard Debian packages
- Web-managed: All administration through browser interfaces — no terminal required
- Port-based routing: Each application gets a dedicated HTTPS port with path redirects for discoverability (e.g.,
halos.local/grafana/) - Single sign-on: One login grants access to all web applications
- Auto-discovery: Installed apps automatically appear in the dashboard
- Standard tooling: Built on proven Debian technologies (APT, systemd, Docker)
Layer Architecture
HaLOS is organized in four layers, each building on the one below:
graph TB
    subgraph L4["Application Layer"]
        Apps["Container Apps<br/>(Signal K, Grafana, InfluxDB, AvNav, ...)"]
    end

    subgraph L3["Web Management Layer"]
        Traefik["Traefik<br/>Reverse Proxy<br/>(ports 80/443/4430-4450)"]
        Authelia["Authelia<br/>SSO Identity Provider"]
        Homarr["Homarr<br/>Dashboard"]
        Cockpit["Cockpit<br/>System Admin<br/>(port 9090)"]
        Adapter["Homarr Adapter"]
    end

    subgraph L2["Platform Layer"]
        Docker["Docker Engine"]
        Systemd["systemd"]
        APT["APT Package Manager"]
        NM["NetworkManager"]
    end

    subgraph L1["Base OS"]
        RPiOS["Raspberry Pi OS (Debian Trixie, arm64)"]
    end

    Apps --> Traefik
    Apps --> Docker
    Traefik --> Authelia
    Homarr --> Traefik
    Adapter --> Homarr
    Adapter --> Docker
    L3 --> Docker
    Docker --> Systemd
    APT --> Systemd
    L2 --> RPiOS
Layer 1: Base OS
Raspberry Pi OS based on Debian Trixie (arm64). Provides the Linux kernel, filesystem, networking, and hardware support. HALPI2 variants add drivers for CAN bus, RS-485, I2C, and power management.
Layer 2: Platform
Standard Linux services that HaLOS builds on:
| Component | Role |
|---|---|
| Docker | Container runtime for all applications |
| systemd | Service management, startup ordering, timers |
| APT | Package installation and updates |
| NetworkManager | WiFi, Ethernet, and AP configuration |
Layer 3: Web Management
The core HaLOS services that provide the unified web experience:
| Component | Role | Access |
|---|---|---|
| Traefik | Reverse proxy, TLS termination, routing | Ports 80/443/4430–4450 |
| Authelia | SSO authentication (Forward Auth + OIDC) | halos.local/sso/ |
| Homarr | Dashboard landing page | halos.local |
| Cockpit | System administration | Port 9090 |
| Homarr Adapter | Container auto-discovery, first-boot setup | Native service |
Layer 4: Applications
Container apps installed by the user. Each app is a Debian package containing a Docker Compose file, systemd service, and Docker labels for routing and dashboard integration.
Component Diagram
The following diagram shows how a browser request reaches an application:
sequenceDiagram
    participant B as Browser
    participant T as Traefik (80/443/4430-4450)
    participant A as Authelia
    participant App as Application

    B->>T: https://halos.local:4431
    T->>A: ForwardAuth check
    alt No valid session
        A-->>T: 401 + redirect
        T-->>B: Redirect to halos.local/sso/
        B->>A: Login (username/password)
        A-->>B: Session cookie + redirect back
        B->>T: Original request (with cookie)
        T->>A: ForwardAuth check
    end
    A-->>T: 200 OK + user headers
    T->>App: Forward request
    App-->>T: Response
    T-->>B: Response
Key Integrations
App Installation Flow
When a container app package is installed via APT:
- APT installs the
.debpackage (Docker Compose file, systemd service, icons) - systemd starts the container service
- Docker pulls the image and starts the container
- Traefik detects the new container's labels and creates a route
- Homarr Adapter detects the
homarr.*labels and adds a tile to the dashboard
All of this happens automatically — the user just clicks "Install" in the app store.
Networking
All proxied containers share a Docker bridge network called halos-proxy-network. Traefik routes requests based on the entrypoint (port) to the appropriate container.
Apps using host networking (e.g., Signal K for hardware access) are routed via host.docker.internal. They retain direct port access.
Further Reading
- Reverse Proxy — Traefik configuration and routing
- Single Sign-On — Authentication architecture
- Dashboard Integration — Homarr auto-discovery
- Package System — Container app packaging
Single Sign-On
HaLOS provides unified authentication across all web applications using Authelia as the identity provider and Traefik as the enforcement point.
Overview
Instead of logging in to each application separately, users authenticate once with Authelia. The session cookie is shared across halos.local (works across all ports), so navigating between applications is seamless.
Two authentication mechanisms are supported:
| Mechanism | How it works | Used by |
|---|---|---|
| Forward Auth | Traefik checks each request with Authelia before forwarding | Most apps (Grafana, InfluxDB) |
| OIDC | App handles OpenID Connect flow directly with Authelia | Homarr, Signal K |
| None | No authentication enforced | AvNav, public dashboards |
Authentication Modes
Forward Auth (Default)
Forward Auth is the default for most applications. The application itself has no knowledge of authentication — Traefik handles it transparently.
sequenceDiagram
    participant B as Browser
    participant T as Traefik
    participant A as Authelia
    participant App as Application

    B->>T: GET halos.local:4431
    T->>A: ForwardAuth check
    A-->>T: 200 OK + user headers
    T->>App: Request + Remote-User header
    App-->>B: Response
Authelia passes user identity to the application via HTTP headers:
| Header | Content |
|---|---|
Remote-User |
Username |
Remote-Groups |
Group memberships |
Remote-Email |
Email address |
Remote-Name |
Display name |
Some applications expect different header names. Per-app middleware can remap headers (e.g., Grafana expects X-WEBAUTH-USER instead of Remote-User).
OIDC
Applications with native OpenID Connect support handle authentication directly with Authelia using the standard Authorization Code flow.
sequenceDiagram
    participant B as Browser
    participant App as Application
    participant A as Authelia

    B->>App: Access application
    App-->>B: Redirect to Authelia
    B->>A: Authorization request
    A-->>B: Login form
    B->>A: Credentials
    A-->>B: Redirect with auth code
    B->>App: Callback with code
    App->>A: Exchange code for tokens
    A-->>App: Access token + ID token
    App-->>B: Authenticated session
OIDC clients are registered with Authelia via configuration snippets. When an OIDC-enabled app is installed, its package drops a YAML snippet into /etc/halos/oidc-clients.d/. Authelia's prestart script merges all snippets into a single configuration file.
The OIDC iss (issuer) claim is bound to one canonical hostname per device — every OIDC client validates iss against a single configured URL, per the OIDC specification. This is why the browser briefly visits the canonical hostname during OIDC login regardless of which hostname the user originally typed. For LAN-only deployments the shipped default of ${hostname}.local is sufficient. Reaching the device from outside the LAN requires the canonical to resolve from the remote network — see Remote Access for the practical patterns.
No Auth
Applications can opt out of authentication entirely. They are accessible without login but still benefit from port-based routing and TLS.
User Database
Authelia uses a file-based user database (users_database.yml) with argon2id password hashes. On first boot, the default admin user is created with credentials from the branding configuration (default: admin/halos).
Users should change the default password immediately after first login via the Cockpit Users panel.
Two Authentication Systems
HaLOS has two separate authentication systems:
- Authelia SSO (
admin/halos): Protects web applications behind Traefik - Linux system auth (
pi/halos): Used by Cockpit (port 9090) and SSH
These are independent. Changing one does not affect the other.
Session Management
- Sessions are stored in a SQLite database backed by Valkey (Redis-compatible) for caching
- Session cookies are scoped to
halos.local, enabling SSO across all ports - Cookies are HTTP-only and Secure (when using HTTPS)
- Sessions expire after a configurable timeout
OIDC Client Registration
When an OIDC-enabled container app is installed:
- The Debian package installs a client snippet to
/etc/halos/oidc-clients.d/{app_id}.yml - Authelia's prestart script reads all snippets from this directory
- Client secrets are hashed and merged into
oidc-clients.yml - Authelia loads the merged configuration on startup
Client snippet format:
# /etc/halos/oidc-clients.d/homarr.yml
client_id: homarr
client_name: Homarr Dashboard
client_secret_file: /var/lib/container-apps/homarr-container/data/oidc-secret
redirect_uris:
  - 'http://${HALOS_DOMAIN}/api/auth/callback/oidc'
scopes: [openid, profile, email, groups]
consent_mode: implicit
When an OIDC app is removed, its postrm script deletes the snippet and Authelia regenerates the merged config on next restart.
Security Considerations
- All traffic encrypted with TLS (self-signed certificate for
halos.local) - Containers communicate over an isolated Docker bridge network
- Traefik exposes ports 80, 443, and 4430–4450 to the host network
- OIDC private keys and client secrets have restricted file permissions (600)
- Passwords stored as non-reversible argon2id hashes
Reverse Proxy
Traefik serves as the central entry point for all HaLOS web traffic, providing port-based routing, TLS termination, and authentication enforcement.
Why a Reverse Proxy?
Without Traefik, each application would be accessed by IP address and port number (e.g., http://192.168.1.50:3000). With Traefik:
- Applications get dedicated HTTPS ports with path redirects for discoverability (e.g.,
halos.local/grafana/) - All traffic is encrypted with HTTPS
- Authentication is enforced centrally
- No port conflicts between applications — ports are assigned automatically
- Ports 80, 443, 9090, and 4430–4450 are exposed to the network
Routing
Traefik uses Docker labels to discover and route to applications automatically. When a container starts with the appropriate labels, Traefik creates a route for it — no configuration files to edit.
Port-Based Routing
Each application gets a dedicated HTTPS port from the range 4430–4450, with a path redirect on the base hostname for discoverability:
| URL | Application |
|---|---|
halos.local |
Homarr dashboard (root domain, port 443) |
halos.local/sso/ |
Authelia login portal (port 443) |
halos.local/<app>/ |
Redirects (302) to halos.local:<port>/ |
halos.local:9090 |
Cockpit web console |
Users navigate to apps via path URLs (e.g., halos.local/grafana/), which redirect to the app's dedicated port. The port numbers are managed automatically.
Port Registry
Ports are assigned from the range 4430–4450 and stored persistently in /etc/halos/port-registry. Each app gets a stable port that survives restarts and upgrades.
Path Redirects
Traefik serves 302 redirects from halos.local/<app-id>/ to halos.local:<port>/. This gives users a predictable, memorable URL without needing to know port numbers.
HALOS_EXTERNAL_PORT Environment Variable
Each container receives a HALOS_EXTERNAL_PORT environment variable with its assigned external port. Apps can use this for generating callback URLs, OIDC redirect URIs, and other self-referential configuration.
Docker Labels
Applications declare their routing via Docker labels in their docker-compose.yml. These labels are auto-generated by configure-container-routing from the app's metadata.yaml — they are not written manually:
services:
  grafana:
    image: grafana/grafana:latest
    labels:
      # Enable Traefik routing
      - "traefik.enable=true"

      # HTTPS router on dedicated port
      - "traefik.http.routers.grafana-secure.rule=PathPrefix(`/`)"
      - "traefik.http.routers.grafana-secure.entrypoints=app-4431"
      - "traefik.http.routers.grafana-secure.tls=true"
      - "traefik.http.routers.grafana-secure.middlewares=authelia@file"

      # Backend service port
      - "traefik.http.services.grafana.loadbalancer.server.port=3000"
    networks:
      - halos-proxy-network
The HALOS_DOMAIN environment variable is set to the device hostname (e.g., halos.local), making the configuration portable across hostname changes.
TLS / HTTPS
Device CA + signed leaf
On first boot, HaLOS generates a small local Certificate Authority and signs a single leaf certificate from it:
- CA: 20-year validity. Lives on the device.
- Leaf: 824 days (Apple's compliance ceiling on cert lifetime — Safari, Brave, system curl, every
SecTrustEvaluateconsumer rejects longer-lived leaves). - SANs: every hostname and IP listed in
/etc/halos/hostnames.confplus the device's${hostname}.local. One cert covers every port the device serves. - Shared with Cockpit: the same leaf is installed on Cockpit's
:9090listener, so both surfaces show the same trust experience and the same cert.
Because the trust anchor is the device's CA — not the leaf itself — installing the CA once on your workstation suppresses warnings for every app, every port, and every leaf rotation. See Trust the device for the install workflow.
The CA is published at https://<host>/halos-ca.crt with Content-Disposition: attachment so browsers offer the OS-level install dialog directly.
Custom CA
Advanced operators with their own internal CA can have HaLOS use it instead of the auto-generated one by dropping ca.crt and ca.key into /etc/halos/ca/. The leaf is then re-signed under that anchor. See docs/CERTS.md in halos-core-containers for the install procedure.
Renewal
A systemd timer checks once a day whether the leaf is within its renewal window (60 days remaining by default) and re-signs if so. Cert rotation does not restart any container: Cockpit reloads its socket, and Traefik picks up the new leaf via a touched dynamic-config file. End users see no interruption.
Let's Encrypt
Let's Encrypt is not supported for .local mDNS domains, as certificate authorities require publicly resolvable domain names. This may be added in the future for users with public domain names.
Network Architecture
Shared Docker Network
All proxied containers join a shared bridge network called halos-proxy-network:
halos-proxy-network (bridge)
├── traefik (owner)
├── authelia
├── homarr
├── grafana-container
├── influxdb-container
└── ... other container apps
Traefik can route to any container on this network by its service name and port.
Host Networking
Some applications require host networking for hardware access (e.g., Signal K needs USB/serial devices). These apps use network_mode: host and are reached by Traefik via host.docker.internal:
services:
  signalk:
    network_mode: host
    labels:
      - "traefik.http.services.signalk.loadbalancer.server.port=3000"
Host networking apps are accessible both via their path redirect URL and their direct port.
Port Exposure Policy
Container apps get dedicated external HTTPS ports via the port registry (range 4430–4450). All HTTP access goes through Traefik on these ports. Exceptions for additional port exposure are allowed for:
- Non-HTTP protocols: NMEA TCP streams, CAN bus data
- Host networking: Required for hardware access (USB, serial)
- External tool compatibility: When third-party tools require specific ports
Traefik Configuration
Entry Points
| Entry Point | Port | Purpose |
|---|---|---|
web |
80 | HTTP (redirects to HTTPS) |
websecure |
443 | HTTPS (dashboard, SSO, path redirects) |
app-4430–app-4450 |
4430–4450 | Per-app dedicated HTTPS ports |
Providers
- Docker provider: Watches for container labels, creates routes automatically
- File provider: Loads static middleware definitions (Authelia ForwardAuth, per-app customizations)
Authentication Middleware
The default Authelia ForwardAuth middleware is defined as a file provider configuration:
http:
  middlewares:
    authelia:
      forwardAuth:
        address: "http://authelia:9091/sso/api/authz/forward-auth"
        trustForwardHeader: true
        authResponseHeaders:
          - Remote-User
          - Remote-Groups
          - Remote-Email
          - Remote-Name
Applications reference this middleware in their Traefik labels to enable authentication. OIDC apps and no-auth apps omit the middleware reference.
Cockpit Integration
Cockpit runs on port 9090 with its own TLS certificate, independent of Traefik. A path redirect at halos.local/cockpit/ redirects to :9090 for discoverability.
Cockpit serves as a fallback if Traefik is down — it's always directly accessible at https://halos.local:9090/.
Dashboard Integration
Homarr provides the main landing page for HaLOS at https://halos.local/. It displays tiles for all installed applications, giving users a single place to access everything.
Components
The dashboard system consists of three packages:
| Package | Type | Role |
|---|---|---|
homarr-container |
Docker container | The Homarr dashboard application |
homarr-container-adapter |
Native Rust binary | First-boot setup and container auto-discovery |
halos-homarr-branding |
Static assets | HaLOS logos, theme colors, default credentials |
Container Auto-Discovery
The homarr-container-adapter runs as a systemd timer (every 60 seconds) and automatically discovers installed container apps:
- Queries the Docker API for all running containers
- Reads
homarr.*labels from each container - Compares with the current Homarr dashboard state
- Adds new apps as tiles, skips apps the user has manually removed
- Saves state to
/var/lib/homarr-container-adapter/state.json
Docker Labels
Container apps declare their dashboard presence via Docker labels:
labels:
  # Required
  - "homarr.enable=true"
  - "homarr.name=Signal K Server"
  - "homarr.url=https://signalk.${HALOS_DOMAIN}"

  # Optional
  - "homarr.description=Marine data processing and routing"
  - "homarr.icon=/icons/signalk.png"
  - "homarr.category=Marine"
These labels are generated automatically by container-packaging-tools from the app's metadata.yaml.
Removed App Tracking
When a user removes an app tile from the Homarr dashboard:
- The adapter detects the tile is missing on next sync
- The app is added to the
removed_appslist in the state file - The adapter will not re-add the tile, even after restarts
Users can always re-add apps manually through the Homarr UI.
First-Boot Setup
On first boot, the adapter performs initial Homarr configuration:
- Completes onboarding -- Steps through Homarr's setup wizard via its API
- Creates admin user -- Username and password from branding config (default:
admin/halos) - Configures settings -- Disables analytics, sets search engine directives
- Creates default board -- Named "HaLOS Dashboard" with a Cockpit tile
- Sets home board -- Makes the dashboard the default landing page
- Applies theme -- Dark mode by default (from branding config)
First-boot detection checks two conditions: the state file shows first_boot_completed: false and Homarr has no boards configured.
Branding
The halos-homarr-branding package provides theming configuration at /etc/halos-homarr-branding/branding.toml:
[identity]
product_name = "HaLOS"
logo_path = "/usr/share/halos-homarr-branding/logo.svg"

[theme]
default_mode = "dark"
primary_color = "#1a73e8"
accent_color = "#4285f4"

[credentials]
admin_username = "admin"
admin_password = "halos"
This separates HaLOS customization from the upstream Homarr container, making it easy to update Homarr without losing branding.
User Customization
Users can customize the dashboard through Homarr's built-in UI:
- Add, remove, and reorder app tiles
- Customize app icons and names
- Group apps into categories
- Add widgets (weather, system stats)
- Switch between themes and layouts
- Drag and drop to reorganize
All customizations are preserved across adapter syncs and system updates.
Homarr API
The adapter communicates with Homarr via its tRPC API using session-based authentication. Key endpoints:
| Operation | Endpoint |
|---|---|
| Create board | POST /api/trpc/board.createBoard |
| Save board | POST /api/trpc/board.saveBoard |
| Set home board | POST /api/trpc/board.setHomeBoard |
| Create app | POST /api/trpc/app.create |
| Get all apps | GET /api/trpc/app.getAll |
| Init user | POST /api/trpc/user.initUser |
| Change color scheme | POST /api/trpc/user.changeColorScheme |
The adapter logs in via Homarr's credentials callback to obtain session cookies, which are then used for all subsequent API calls.
Package System
HaLOS packages container applications as standard Debian .deb packages. This means Docker apps are installed, updated, and removed with APT -- the same package manager used for all other system software.
Why Debian Packages?
Packaging containers as .deb files provides several advantages over Docker Compose files alone:
- Single install command:
sudo apt install marine-grafana-container - Dependency management: APT resolves dependencies automatically (e.g., Docker)
- Clean removal:
apt removestops containers and cleans up - Automatic updates: Standard
apt upgradeworkflow - System integration: systemd services, icons, dashboard tiles — all in one package
- Repository distribution: Published to
apt.halos.filike any APT package
What's in a Container App Package?
A container app package installs the files under /var/lib, /etc/systemd and /usr/share. Its maintainer scripts and service create the rest:
/var/lib/container-apps/{package}/
├── docker-compose.yml          # Docker Compose definition
├── compose                     # Wrapper that runs docker compose with the overrides
├── compose.d/                  # Local Compose overrides (empty when installed)
├── prestart.sh                 # Runs before each start; writes the runtime environment
├── metadata.yaml               # App metadata
├── env.user-template           # Template for the local env file
├── config.yml                  # User-configurable settings
├── env.template                # Default environment values
└── data/                       # Persistent app data, kept on remove and purge

/etc/container-apps/{package}/
├── env.defaults                # Created by postinst from env.template on each install and upgrade
└── env                         # Created by postinst once; local overrides, kept across upgrades

/run/container-apps/{package}/
└── runtime.env                 # Environment generated by prestart.sh at each start

/etc/systemd/system/
└── {package}.service           # systemd service unit

/usr/share/pixmaps/
└── {package}.{svg,png}         # Icon for store and dashboard (extension of the source icon)
The package is intentionally lightweight — it does not contain the Docker image itself. The actual container image is pulled from the registry when the service starts for the first time. This keeps packages small (a few kilobytes) and ensures you always get the exact image version specified in the compose file.
The systemd service runs Compose through the compose wrapper, which passes docker-compose.yml, then the generated routing-labels file for routed apps, then any files in compose.d/. Before starting, the service runs prestart.sh and compose config --quiet, so an invalid project fails the start. It then runs compose up in the foreground, and on stop runs docker compose -p <project> down --remove-orphans. The stop uses only the project name, so it does not depend on the files in compose.d/.
compose.d/ holds local overrides written by the administrator. See App Data and Migration — Customising an app with compose.d.
App Definition Format
Developers define container apps using three files:
metadata.yaml
The central definition file. Contains package metadata, version, tags, routing configuration, and Docker labels.
name: Grafana
app_id: grafana
version: 12.3.2-1
upstream_version: 12.3.2
description: Data visualization and monitoring platform
homepage: https://grafana.com/
maintainer: Hat Labs <support@hatlabs.fi>
license: AGPL-3.0

tags:
  - role::container-app
  - field::marine
  - category::visualization
  - category::monitoring
  - interface::web

routing:
  auth:
    mode: forward_auth

web_ui:
  enabled: true
  port: 3000
  protocol: http
See the Container Metadata Reference for the full schema.
docker-compose.yml
Standard Docker Compose file. The container-packaging-tools adds Traefik labels and Homarr labels automatically based on metadata.yaml.
config.yml
User-configurable settings that are exposed as environment variables through /etc/container-apps/{package}/env.defaults, and overridable in /etc/container-apps/{package}/env.
container-packaging-tools
The generate-container-packages command converts app definitions into Debian packages:
apps/grafana/                    generate-container-packages
├── metadata.yaml          ──────────────────────────►     marine-grafana-container_12.3.2-1_all.deb
├── docker-compose.yml
├── config.yml
└── icon.png
The tool:
- Validates the metadata against the schema
- Generates Traefik routing labels from the
routingconfiguration - Generates Homarr dashboard labels from the metadata
- Creates Debian packaging files (control, rules, postinst, prerm, postrm)
- Builds the
.debpackage withdpkg-buildpackage
Tag-Based Categorization
Packages use a tag-based categorization system with debtag facets. This enables domain-specific stores to organize packages meaningfully.
Key Facets
| Facet | Purpose | Examples |
|---|---|---|
field:: |
Application domain | field::marine, field::core |
category:: |
User-facing store category | category::navigation, category::monitoring |
role:: |
Package type | role::container-app |
interface:: |
UI type | interface::web |
How Store Filtering Works
- A store configuration defines filter rules (e.g.,
include_tags: [field::marine]) - The backend filters all packages matching those tags
- Categories are auto-discovered from
category::*tags on matched packages - The store UI displays packages organized by category
# store/marine.yaml
id: marine
name: Marine Navigation & Monitoring
filters:
  include_tags:
    - field::marine
category_metadata:
  - id: navigation
    label: Navigation & Charts
    icon: MapIcon
New categories appear automatically when a package uses a new category::* tag -- no store configuration update needed.
APT Repository
Container app packages are published to apt.halos.fi:
| Channel | Purpose | Tag format |
|---|---|---|
trixie-stable |
Production releases | v{version}+{N} |
trixie-unstable |
Pre-release testing | v{version}+{N}_pre |
The CI/CD pipeline builds packages on push to main, publishes to unstable, and promotes to stable when a GitHub release is published.
Install Lifecycle
Installation
apt install marine-grafana-container
  → dpkg extracts files (seconds — package is small)
  → postinst creates data directories, generates secrets
  → systemd starts marine-grafana-container.service
    → prestart.sh computes runtime configuration
    → docker compose up
      → Docker pulls image layers from registry (may take minutes on first install)
      → Container starts
      → Traefik detects labels, creates route
      → Homarr adapter adds dashboard tile
Removal
apt remove marine-grafana-container
  → prerm stops marine-grafana-container.service
    → docker compose down
      → Traefik removes route
      → Homarr adapter detects removal
  → dpkg removes package files
Updates
apt upgrade
  → dpkg extracts updated files, overwriting docker-compose.yml
  → systemd restarts the service
    → docker compose pulls new image (only if upstream version changed) and recreates container
  → compose.d/ overrides and persistent data in /var/lib/container-apps/{package}/data/ are preserved
Version Management
Container app packages use a two-part version scheme:
- Upstream version: The application version (e.g.,
12.3.2) - Revision: Auto-incremented by CI (e.g.,
-1,-2)
The full Debian version is {upstream}-{revision} (e.g., 12.3.2-1). Revisions increment automatically on each CI build, even if the upstream version hasn't changed.
Developer Guide
Workspace Setup
HaLOS development uses a central workspace repository (halos-distro) that brings together all component repositories. This workspace is designed from the ground up for AI-assisted development.
AI-First Development
The recommended way to develop for HaLOS is with an AI coding assistant like Claude Code. The workspace structure, documentation, and AGENTS.md files are optimized for this workflow.
Always work from the halos-distro workspace root -- this gives the assistant full context across all repositories, enabling it to understand cross-cutting concerns, follow established patterns, and produce consistent code.
With this setup, tasks that would otherwise require navigating multiple config formats and conventions become straightforward conversations:
- "Add a new marine container app for yacht-radar" -- Claude reads the existing apps, follows the conventions, and produces the full set of files
- "Fix the search filtering in cockpit-apt" -- Claude navigates the three-tier architecture, writes the fix, adds tests, and creates a PR
- "Why is the Grafana OIDC login failing?" -- Claude checks the SSO config, Docker labels, prestart script, and Authelia client registration
For practical tips on working with AI assistants, see Life with Claude in the workspace.
Clone the Workspace
# Clone the workspace repository
git clone https://github.com/halos-org/halos-distro.git
cd halos-distro

# Clone all component repositories
./run repos:clone
This clones all HaLOS repositories into the workspace directory. Each repository is independent -- there are no git submodules.
Prerequisites
- Git for version control
- Docker for containerized builds and tests
- lefthook for pre-commit hooks (
brew install lefthookon macOS) - SSH key registered with GitHub for cloning private repositories
Language-specific tools are needed only for the repositories you work on:
| Repository | Tools |
|---|---|
| Container packaging tools | Python 3.11+, uv |
| Cockpit modules | Node.js 18+, npm |
| mDNS publisher, Homarr adapter | Rust (via Docker -- no local install needed) |
| Pi-gen image builder | Docker only |
Update Repositories
# Pull latest changes for all repositories
./run repos:pull-all-main

# Check status across all repositories
./run repos:status
Install Pre-commit Hooks
Each repository that supports pre-commit hooks has a lefthook.yml configuration:
# Per-repository setup
cd cockpit-apt
./run hooks-install

cd ../halos-mdns-publisher
./run hooks-install
Pre-commit hooks run format and lint checks matching what CI runs, catching issues before they reach the pipeline.
Repository Overview
halos-distro/                       # Workspace root
├── docs/                           # Shared development documentation
│   ├── DEVELOPMENT_WORKFLOW.md
│   ├── IMPLEMENTATION_CHECKLIST.md
│   ├── LIFE_WITH_CLAUDE.md
│   └── ...
├── AGENTS.md                       # Central agent context file
├── run                             # Workspace management script
│
├── halos-pi-gen-wt2/               # Image builder (pi-gen)
├── cockpit-apt/                    # APT package manager UI
├── cockpit-container-apps/         # Container app store UI
├── cockpit-authelia-users/         # Authelia user management
├── container-packaging-tools/      # App → .deb converter
├── halos-core-containers/          # Core apps (Traefik, Authelia, Homarr)
├── halos-marine-containers/        # Marine app definitions + store
├── halos-mdns-publisher/           # mDNS hostname publisher (Rust)
├── homarr-container-adapter/       # Dashboard auto-discovery (Rust)
├── halos-homarr-branding/          # Homarr HaLOS theming
├── halos-metapackages/             # halos & halos-marine metapackages
├── halos-cockpit-config/           # Cockpit branding
├── halos-imported-containers/      # Auto-imported community apps
├── shared-workflows/               # Reusable GitHub Actions
└── ...
Each repository has its own AGENTS.md with detailed development documentation, build commands, and architecture notes.
Working in a Repository
# Navigate to a repository
cd cockpit-apt

# Create a feature branch
git checkout -b feat/my-feature

# Build and test (commands vary by repo)
./run test
./run lint

# Commit and push
git add -p
git commit -m "feat(scope): description"
git push -u origin feat/my-feature
See Development Workflow for the full process.
Development Workflow
This guide covers the workflow for contributing code changes to HaLOS repositories.
AI-Assisted Workflow
The fastest way to work on HaLOS is with Claude Code from the halos-distro workspace. Point it at a GitHub issue and it handles the workflow:
"Work on cockpit-apt issue #12. Follow the development workflow."
Claude creates a feature branch, writes the code and tests, runs CI-matching checks locally via pre-commit hooks, and prepares a PR -- following the conventions documented below. For details on working effectively with AI assistants, see Life with Claude.
The rest of this page documents the conventions that Claude (and human developers) follow.
Branching Strategy
All changes go through feature branches and pull requests. Never push directly to main.
# Create a feature branch from main
git checkout main
git pull origin main
git checkout -b feat/my-feature

# Branch naming convention
# feat/description   - New features
# fix/description    - Bug fixes
# docs/description   - Documentation
# chore/description  - Maintenance tasks
# refactor/description - Code restructuring
Commit Conventions
Use conventional commits:
- type:
feat,fix,docs,style,refactor,test,chore,perf - scope: Component or module (optional)
- subject: Imperative mood, max 50 characters, no period
Examples:
feat(search): add case-insensitive matching
fix(install): handle permission errors
docs: update README with container setup
test(backend): add search edge case tests
refactor(ui): extract PackageCard component
Keep commits small and atomic -- one logical change per commit. Rebase and clean up history before creating a PR.
Pull Requests
Creating a PR
# Push your branch
git push -u origin feat/my-feature

# Create PR via GitHub CLI
gh pr create --title "feat: add feature X" --body "Description..."
PR guidelines:
- One logical change per PR -- refactoring and behavior changes belong in separate PRs
- Descriptive titles -- they're often used for release notes
- Explain motivation in the description (why, not what -- the diff shows what changed)
- Link issues with
closes #Norfixes #N
CI Checks
All PRs run automated checks via GitHub Actions. Checks must pass before merging.
Common checks across repositories:
| Check | Purpose |
|---|---|
| Tests | Unit and integration tests |
| Lint | Code style enforcement (ruff, eslint, clippy) |
| Type check | Static type analysis (pyright, tsc) |
| Format | Code formatting verification |
| Version bump | Ensures version is bumped for package-affecting changes |
Review and Merge
- Wait for CI checks to pass
- Address any review feedback
- Merge using merge commits (not squash) to preserve commit history
Version Bumps
PRs that change package-affecting files must include a version bump. CI enforces this.
What Requires a Bump
Changes to source code, packaging files, or configuration that affect the built package.
What's Exempt
CI automatically excludes these from the version bump requirement:
- Documentation (
*.md,docs/) - Tests (
tests/,*_test.*) - CI configuration (
.github/) - Development tooling (
docker-compose.dev*,tools/) - Lock files (
*.lock)
How to Bump
Most repositories use ./run bumpversion:
# Bump patch version (0.2.0 → 0.2.1)
./run bumpversion patch

# Bump minor version (0.2.0 → 0.3.0)
./run bumpversion minor

# Bump major version (0.2.0 → 1.0.0)
./run bumpversion major
Clean Working Directory
The working directory must be clean before bumping. Commit all code changes first, then run bumpversion. It automatically commits the version change.
Container app repositories (like halos-marine-containers) version each app independently in its metadata.yaml file.
Pre-commit Hooks
Repositories use lefthook for pre-commit hooks. These run the same checks as CI locally before each commit.
# Install hooks (per repository)
./run hooks-install

# Skip hooks when needed (e.g., WIP commits)
git commit --no-verify -m "WIP: message"
CI/CD Pipeline
On Push to Main
- CI builds the Debian package
- Creates a pre-release tag (
v{version}+{N}_pre) - Publishes
.debto the unstable channel ofapt.halos.fi(apt.hatlabs.fifor repos in thehatlabsorganisation) - Creates a draft GitHub release
Publishing Stable Releases
- Test the unstable package on a device
- Publish the draft release in GitHub UI
- CI copies the
.debto the stable release - CI publishes to the stable channel of the same repository
Development Environments
Docker-based (Recommended)
Most repositories provide Docker-based development commands:
./run docker-build    # Build development container
./run test            # Run tests in Docker
./run lint            # Run linting in Docker
./run shell           # Interactive shell in container
This ensures consistent environments across platforms and eliminates "works on my machine" issues.
Local Development
For faster iteration, some repositories support local development. See each repository's AGENTS.md for specific instructions.
Adding Apps
This guide covers creating a new container application for HaLOS.
The Quick Way: Ask Claude
If you're working with Claude Code from the halos-distro workspace (see Workspace Setup), adding an app is a conversation:
"Add a new marine container app called yacht-radar. It uses the image
example/yacht-radar:2.1.0, has a web UI on port 8080, and should use forward auth. Put it in the navigation category."
Claude reads the existing apps in halos-marine-containers/apps/, follows the established patterns, and produces the complete set of files: metadata.yaml, docker-compose.yml, icon, and configuration. It handles the conventions documented below -- auth modes, Traefik labels, tag taxonomy, volume paths -- without you needing to look them up.
This works because the workspace has rich context: every existing app serves as an example, and each repository's AGENTS.md documents the conventions. The rest of this page documents those conventions for reference.
App Structure
Each app lives in a directory under apps/ in either halos-core-containers (pre-installed) or halos-marine-containers (store apps):
apps/my-app/
├── metadata.yaml        # Package metadata, tags, routing
├── docker-compose.yml   # Docker service definition
├── config.yml           # User-configurable settings (optional)
├── prestart.sh          # Pre-start script (optional)
└── icon.png             # Application icon (256x256, PNG)
Step 1: Create metadata.yaml
The metadata file defines everything about the package:
name: My App
app_id: my-app
version: 1.0.0-1
upstream_version: 1.0.0
description: Short description of the application
long_description: |
  Longer description with details about features
  and capabilities. Shown in the app store.

homepage: https://example.com/
maintainer: Hat Labs <support@hatlabs.fi>
license: MIT

tags:
  # Domain (required for store filtering)
  - role::container-app
  - field::marine

  # User-facing categories
  - category::monitoring

  # Technical characteristics
  - interface::web

debian_section: web
architecture: all

depends:
  - docker.io (>= 20.10) | docker-ce (>= 20.10)

routing:
  auth:
    mode: forward_auth    # or: oidc, none

web_ui:
  enabled: true
  port: 8080
  protocol: http
Authentication Modes
Choose the appropriate auth mode in routing.auth.mode:
| Mode | When to use |
|---|---|
forward_auth |
Default. App has no SSO support. Traefik handles auth transparently. |
oidc |
App has native OIDC support (e.g., Grafana, Homarr). |
none |
App should be publicly accessible or handles its own auth. |
Tags
Tags determine where the app appears in the store:
field::marine-- Include in the Marine storecategory::navigation-- Appear under "Navigation & Charts" categoryrole::container-app-- Identifies this as a container appinterface::web-- Has a web UI
See the Container Metadata Reference for all available fields.
Step 2: Create docker-compose.yml
Write a standard Docker Compose file. Do not include Traefik, Homarr, or mDNS labels -- these are generated automatically from metadata.yaml.
services:
  my-app:
    image: example/my-app:${UPSTREAM_VERSION:-1.0.0}
    container_name: my-app
    init: true
    restart: unless-stopped
    env_file:
      - runtime.env
    volumes:
      - ${CONTAINER_DATA_ROOT}/my-app/data:/app/data
    networks:
      - halos-proxy-network
    logging:
      driver: journald
      options:
        tag: "{{.Name}}"

networks:
  halos-proxy-network:
    external: true
Key conventions:
- Init: Always set
init: trueso Docker uses tini as PID 1 for proper signal handling (graceful shutdown) - Restart policy: Always
unless-stopped - Logging: Use
journalddriver so logs are accessible via Cockpit - Network: Join
halos-proxy-networkfor Traefik routing - Port assignment: External HTTPS ports are assigned automatically by the port registry — do not add a
ports:section unless the app needs non-HTTP protocol access - Data volumes: Use
${CONTAINER_DATA_ROOT}for persistent data
Host Networking Apps
If the app needs hardware access (USB, serial, CAN bus):
services:
  my-app:
    image: example/my-app:latest
    init: true
    network_mode: host
    # No networks section when using host networking
Add host_port to routing in metadata.yaml:
Step 3: Add config.yml (Optional)
Define user-configurable settings:
settings:
  MY_APP_PORT:
    default: "8080"
    description: "HTTP port for the application"
  MY_APP_TIMEZONE:
    default: "${TZ:-UTC}"
    description: "Application timezone"
Their defaults land in /etc/container-apps/<package-name>/env.defaults and local values in /etc/container-apps/<package-name>/env, editable through the Cockpit configuration UI. The service reads both as environment variables.
Step 4: Add an Icon
Include a icon.png file (256x256 pixels, PNG format). This is displayed in:
- The container app store
- The Homarr dashboard tile
- The Cockpit service list
Step 5: Build and Test
Build the Package
This requires container-packaging-tools to be installed.
Test Locally
- Copy the
.debto a test device - Install:
sudo apt install ./my-app-container_1.0.0-1_all.deb - Verify the container starts:
docker ps - Check the app is accessible:
https://halos.local/my-app/ - Verify the app appears in the Homarr dashboard
- Test removal:
sudo apt remove my-app-container
Step 6: Submit a PR
- Create a feature branch in the appropriate repository
- Add your app directory under
apps/ - Create a PR with a clear description
- CI will build and validate the package
For marine apps, add the app to halos-marine-containers. For core infrastructure apps, add to halos-core-containers.
Example: Complete Marine App
Here's a complete example of a marine monitoring app:
name: Marine Monitor
app_id: marine-monitor
version: 1.0.0-1
upstream_version: 1.0.0
description: Real-time marine sensor monitoring
homepage: https://example.com/marine-monitor
maintainer: Hat Labs <support@hatlabs.fi>
license: MIT

tags:
  - role::container-app
  - field::marine
  - category::monitoring
  - interface::web
  - use::monitoring

debian_section: net
architecture: all

depends:
  - docker.io (>= 20.10) | docker-ce (>= 20.10)

routing:
  auth:
    mode: forward_auth

web_ui:
  enabled: true
  port: 3000
  protocol: http
services:
  marine-monitor:
    image: example/marine-monitor:${UPSTREAM_VERSION:-1.0.0}
    container_name: marine-monitor
    init: true
    restart: unless-stopped
    env_file:
      - runtime.env
    volumes:
      - ${CONTAINER_DATA_ROOT}/marine-monitor/data:/data
    networks:
      - halos-proxy-network
    logging:
      driver: journald
      options:
        tag: "{{.Name}}"

networks:
  halos-proxy-network:
    external: true
Building Images
HaLOS images are built using pi-gen, the official Raspberry Pi OS image builder. The halos-pi-gen repository extends pi-gen with custom stages for HaLOS.
Prerequisites
- Docker (for containerized builds)
- Sufficient disk space (~10 GB per image variant)
No other tools are needed -- the build runs entirely inside Docker.
Build Commands
cd halos-pi-gen

# Build a specific image variant
./run docker-build "Halos-Marine-HALPI2"

# Build all enabled variants
./run docker-build-all

# Clean up build artifacts
./run docker-clean
Builds produce a compressed .img file suitable for flashing to an SD card or SSD.
Image Variants
Each variant is defined by a config.* file that specifies the image name and which stages to include.
Available Variants
| Config File | Image Name | Hardware | Desktop | Marine |
|---|---|---|---|---|
config.halos-halpi2 |
Halos-HALPI2 | HALPI2 | No | No |
config.halos-desktop-halpi2 |
Halos-Desktop-HALPI2 | HALPI2 | Yes | No |
config.halos-marine-halpi2 |
Halos-Marine-HALPI2 | HALPI2 | No | Yes |
config.halos-desktop-marine-halpi2 |
Halos-Desktop-Marine-HALPI2 | HALPI2 | Yes | Yes |
config.halos-rpi |
Halos-RPI | Generic RPi | No | No |
config.halos-desktop-rpi |
Halos-Desktop-RPI | Generic RPi | Yes | No |
config.halos-marine-rpi |
Halos-Marine-RPI | Generic RPi | No | Yes |
config.halos-desktop-marine-rpi |
Halos-Desktop-Marine-RPI | Generic RPi | Yes | Yes |
Additional variants:
config.halos-desktop-marine-halpi2-ap-- Pre-installation image with default WiFi access pointconfig.raspios-lite-halpi2-- Stock RPi OS (headless) with HALPI2 driversconfig.raspios-halpi2-- Stock RPi OS (desktop) with HALPI2 drivers
Config File Format
Each config file defines the image name and the list of stages to include:
IMG_NAME="Halos-Marine-HALPI2"
STAGE_LIST="stage0 stage1 stage2 stage-common stage-halpi2-common stage-halos-base stage-halpi2-marine stage-halos-marine stage-halos-headless stage-export"
Stage System
Pi-gen uses a stage-based build system. Stages run in order, and each stage can install packages, copy files, and run scripts.
Standard Pi-gen Stages
| Stage | Purpose |
|---|---|
stage0 |
Bootstrap (debootstrap) |
stage1 |
Essential packages |
stage2 |
Lite system (networking, users) |
stage-common |
Common configuration |
Custom HaLOS Stages
| Stage | Purpose | Included In |
|---|---|---|
stage-halos-base |
Cockpit, Docker, Traefik, Authelia, Homarr | All HaLOS variants |
stage-halpi2-common |
HALPI2 hardware drivers (CAN, RS-485, I2C, firmware) | HALPI2 variants |
stage-halpi2-marine |
HALPI2 marine hardware (GNSS HAT, UART) | HALPI2 + Marine |
stage-halos-marine |
Marine app store, pre-installed marine apps | Marine variants |
stage-halos-headless |
Headless-specific config (no desktop) | Headless variants |
Stage File Structure
Each stage directory contains numbered tasks:
stage-halos-base/
├── 00-install-docker/
│   ├── 00-packages            # APT packages to install
│   └── 01-run-chroot.sh       # Script to run inside the image
├── 01-install-cockpit/
│   ├── 00-packages
│   └── 01-run-chroot.sh
├── 02-install-core-containers/
│   ├── 00-run.sh              # Script to run on the host
│   └── 01-run-chroot.sh
└── ...
Task types:
00-packages-- List of APT packages to install00-run.sh-- Script that runs on the host (has access to the filesystem)01-run-chroot.sh-- Script that runs inside the image (chroot environment)files/-- Configuration files to copy into the image
Customization
Adding a Package
To add a package to all HaLOS images, create a new task in stage-halos-base:
Adding a Configuration File
# stage-halos-base/03-my-config/files/etc/my-config.conf
# (the file content)

# stage-halos-base/03-my-config/01-run-chroot.sh
install -m 644 files/etc/my-config.conf /etc/my-config.conf
Creating a New Stage
- Create a directory:
stage-my-stage/ - Add numbered task directories with scripts and package lists
- Reference the stage in the appropriate
config.*files
CI/CD
PR Checks
PRs run lightweight validation:
- shellcheck on all scripts
- Stage and config file validation
Main Branch Builds
Pushes to main trigger full image builds for all variants:
- Each variant builds in a Docker container
- Completed images are uploaded as release artifacts
- A draft GitHub release is created
Image builds are resource-intensive and can take 30-60 minutes per variant.
Contributing
Contributions to HaLOS are welcome. Each component repository accepts pull requests independently.
Getting Started
- Set up the development workspace -- this also sets up the AI-assisted workflow
- Read the development workflow
- Find an issue to work on in the relevant repository
If you're using Claude Code or a similar AI assistant, you can ask it to survey open issues across repositories and suggest what to work on next.
Reporting Issues
Report bugs and feature requests on the appropriate GitHub repository:
- General / cross-cutting: halos-distro
- Image builds: halos-pi-gen
- Package manager UI: cockpit-apt
- Container app store: cockpit-container-apps
- Container packaging tools: container-packaging-tools
- Marine apps: halos-marine-containers
- mDNS publisher: halos-mdns-publisher
- Dashboard adapter: homarr-container-adapter
When reporting a bug, include:
- HaLOS image variant and version
- Steps to reproduce
- Expected vs actual behavior
- Relevant logs (from Cockpit Logs or
journalctl)
Submitting Changes
- Fork the repository
- Create a feature branch (
feat/description,fix/description) - Make your changes following the coding standards below
- Run tests and linting locally
- Submit a pull request with a clear description
See Development Workflow for the full process.
Coding Standards
General
- Write self-documenting code; comments explain "why", not "what"
- Keep functions small and focused
- No magic numbers -- use named constants
- Validate inputs at system boundaries
Language-Specific
| Language | Linter | Formatter | Type Checker |
|---|---|---|---|
| Python | ruff | ruff | pyright or ty |
| TypeScript | ESLint | Prettier | tsc (strict mode) |
| Rust | clippy | rustfmt | (built-in) |
| Shell | shellcheck | -- | -- |
Testing
- All new code should have tests
- Test behavior, not implementation details
- Run tests locally before pushing:
./run test
Debian Packaging
- Never edit
debian/changelogdirectly -- use./run bumpversion - Include a version bump for package-affecting changes
- Test package installation and removal on a test device
Communication
- Discussions: GitHub Discussions for questions, ideas, and general conversation
- Issues: For specific bugs and feature requests
- Pull Requests: For code contributions
Reference
Container Metadata
Reference for the metadata.yaml format used to define container applications.
Overview
Every container app has a metadata.yaml file that describes the package, its tags, routing, and web UI configuration. The container-packaging-tools package reads this file to generate a Debian package.
Required Fields
| Field | Type | Description |
|---|---|---|
name |
string | Human-readable application name |
app_id |
string | Unique identifier (lowercase, hyphens allowed) |
version |
string | Package version in {upstream}-{revision} format |
upstream_version |
string | Upstream application version |
description |
string | Short description (one line) |
maintainer |
string | Maintainer name and email |
license |
string | SPDX license identifier |
tags |
list | Debtag faceted classification tags |
debian_section |
string | Debian archive section (e.g., web, net) |
architecture |
string | Package architecture (all, arm64) |
Optional Fields
| Field | Type | Default | Description |
|---|---|---|---|
long_description |
string | -- | Multi-line description for the app store |
homepage |
string | -- | Project homepage URL |
depends |
list | -- | Debian package dependencies |
recommends |
list | -- | Recommended packages |
provides |
list | -- | Virtual packages provided |
conflicts |
list | -- | Conflicting packages |
routing |
object | -- | Traefik routing configuration |
web_ui |
object | -- | Web UI configuration |
layout |
object | -- | Dashboard layout hints |
default_config |
object | -- | Default environment variables |
system_bin |
list | -- | System binaries provided |
Tags
Tags use the debtag faceted classification system:
Standard Facets
| Facet | Purpose | Examples |
|---|---|---|
field:: |
Application domain | field::marine, field::core |
role:: |
Software type | role::container-app |
interface:: |
UI type | interface::web, interface::cli |
use:: |
Primary use case | use::routing, use::monitoring |
works-with:: |
Data types handled | works-with::maps, works-with::logfile |
network:: |
Network role | network::server, network::client |
scope:: |
Application scope | scope::application, scope::utility |
Custom HaLOS Facet
| Facet | Purpose | Examples |
|---|---|---|
category:: |
User-facing store category | category::navigation, category::monitoring |
Tagging Guidelines
- Always include
role::container-app - Include at least one
field::tag for store filtering - Include at least one
category::tag for store organization - Multiple
category::tags are allowed (app appears in each) - Use standard facets for technical characteristics
Routing Configuration
The routing section configures Traefik reverse proxy integration:
routing:
  auth:
    mode: forward_auth         # Authentication mode
    forward_auth:              # Only for forward_auth mode
      headers:                 # Header remapping (optional)
        Remote-User: X-WEBAUTH-USER
        Remote-Groups: X-WEBAUTH-GROUPS
  port: 3000                   # Backend port (for host networking apps)
Auth Modes
| Mode | Description |
|---|---|
forward_auth |
Traefik checks authentication with Authelia (default) |
oidc |
App handles OIDC flow directly with Authelia |
none |
No authentication enforced |
HALOS_EXTERNAL_PORT
Each container receives a HALOS_EXTERNAL_PORT environment variable containing its assigned external HTTPS port (from range 4430–4450). Apps can use this for generating callback URLs, self-referential links, and OIDC redirect URIs.
Web UI Configuration
web_ui:
  enabled: true          # Whether the app has a web interface
  port: 3000             # Internal container port
  protocol: http         # http or https
  path: /                # Base path (usually /)
  visible: true          # Show in dashboard and store
Layout Configuration
Dashboard layout hints for the Homarr adapter:
layout:
  priority: 40           # Sort order (lower = earlier)
  width: 2               # Tile width (grid units)
  height: 2              # Tile height (grid units)
  x_offset: 0            # Horizontal position
  y_offset: 0            # Vertical position
Default Configuration
Default environment variables for the container:
Variables referencing ${HALOS_DOMAIN} or ${TZ} are expanded at runtime.
Complete Example
name: Signal K Server
app_id: signalk-server
version: 2.21.2-2
upstream_version: 2.21.2
description: Signal K server for marine data processing and routing
long_description: |
  Signal K is a modern and open data format for marine use. A Signal K server
  provides a central hub for collecting, processing, and distributing marine
  data from multiple sources including NMEA 0183, NMEA 2000, and other sensors.

homepage: https://signalk.org/
maintainer: Hat Labs <support@hatlabs.fi>
license: Apache-2.0

tags:
  - role::container-app
  - field::marine
  - category::communication
  - category::monitoring
  - interface::web
  - use::routing
  - network::server

debian_section: net
architecture: all

depends:
  - docker.io (>= 20.10) | docker-ce (>= 20.10)
  - python3-bcrypt

web_ui:
  enabled: true
  path: /
  port: 3000
  protocol: http
  visible: true

layout:
  priority: 40
  width: 2
  height: 2

routing:
  auth:
    mode: none
  port: 3000

default_config:
  SIGNALK_PORT: "3000"
  SIGNALK_OIDC_ENABLED: "true"
  SIGNALK_OIDC_ISSUER: "https://${HALOS_DOMAIN}/sso"
  SIGNALK_OIDC_CLIENT_ID: "signalk"
Core Containers
The core containers provide the foundational web infrastructure for HaLOS. They are pre-installed in all HaLOS images and managed as a single unit by the halos-core-containers package.
Overview
| Container | Image | Purpose |
|---|---|---|
| Traefik | traefik:v3.6 |
Reverse proxy, TLS termination, routing |
| Authelia | authelia/authelia:4.39 |
SSO identity provider (ForwardAuth + OIDC) |
| Authelia Valkey | valkey/valkey:9.0-alpine |
Session cache for Authelia |
| Homarr | ghcr.io/homarr-labs/homarr:v2.5.2 |
Dashboard landing page |
All containers are managed by a single systemd service: halos-core-containers.service.
Traefik
Purpose
Reverse proxy that receives all incoming HTTP/HTTPS traffic and routes it to the appropriate application based on the port/entrypoint.
Ports
| Port | Protocol | Purpose |
|---|---|---|
| 80 | HTTP | Redirects to HTTPS |
| 443 | HTTPS | Dashboard, SSO, path redirects |
| 4430–4450 | HTTPS | Per-app dedicated ports |
Configuration
| Path | Purpose |
|---|---|
/var/lib/container-apps/halos-core-containers/assets/traefik/traefik.yml |
Static configuration |
/etc/halos/traefik-dynamic.d/ |
Dynamic middleware directory (apps drop files here) |
/var/lib/container-apps/halos-core-containers/traefik/certs/ |
TLS certificates |
Docker Network
Traefik creates and owns halos-proxy-network. All proxied containers must join this network.
Key Labels
Traefik discovers routes from Docker container labels. See Reverse Proxy for the label format.
Authelia
Purpose
Identity provider that authenticates users and provides SSO across all HaLOS web applications.
Access
- URL:
https://halos.local/sso/ - No direct port exposure — accessed through Traefik
Authentication Methods
- ForwardAuth: Default for most apps. Traefik checks each request with Authelia.
- OIDC: For apps with native OpenID Connect support (Homarr, Signal K).
Configuration
| Path | Purpose |
|---|---|
/var/lib/container-apps/halos-core-containers/authelia/configuration.yml |
Base configuration (regenerated on restart) |
/var/lib/container-apps/halos-core-containers/authelia/oidc-clients.yml |
Merged OIDC client definitions |
/var/lib/container-apps/halos-core-containers/authelia/users_database.yml |
User credentials (argon2id hashes) |
/etc/halos/oidc-clients.d/ |
OIDC client snippets (per-app) |
User Database
File-based user storage. Default admin user: admin/halos.
See Single Sign-On for details on authentication modes and OIDC client registration.
Authelia Valkey
Purpose
Redis-compatible in-memory cache for Authelia session data. Uses Valkey (open-source Redis fork).
Configuration
- Data persisted to
/var/lib/container-apps/halos-core-containers/authelia/valkey/ - Append-only file (AOF) enabled for durability
- Connected to Authelia via an internal-only Docker network
Homarr
Purpose
Dashboard application that serves as the main landing page at https://halos.local/.
Access
- URL:
https://halos.local(root domain via Traefik) - Internal port: 7575 (localhost only, for
homarr-container-adapter)
Configuration
| Path | Purpose |
|---|---|
/var/lib/container-apps/halos-core-containers/data/homarr/data/ |
Persistent Homarr data (boards, settings) |
/etc/halos-homarr-branding/branding.toml |
HaLOS theming (from halos-homarr-branding package) |
SSO Integration
Homarr uses OIDC authentication with Authelia. Auto-login is enabled -- users are redirected to Authelia automatically and returned to the dashboard after authentication.
Related Packages
| Package | Purpose |
|---|---|
homarr-container-adapter |
First-boot setup and container auto-discovery |
halos-homarr-branding |
HaLOS logos, theme colors, default credentials |
See Dashboard Integration for the auto-discovery mechanism.
Service Management
# Check status
sudo systemctl status halos-core-containers

# View logs
sudo journalctl -u halos-core-containers -f

# Restart all core containers
sudo systemctl restart halos-core-containers

# Check individual container status
sudo docker ps --filter "name=traefik" --filter "name=authelia" --filter "name=homarr"
System Binaries
The core containers package provides system binaries that other container packages use:
| Binary | Purpose |
|---|---|
configure-container-routing |
Sets up Traefik routing for an app (port assignment, labels, path redirect) |
reload-oidc-clients |
Regenerates merged OIDC client configuration |
Marine Containers
Reference for the marine container applications available in the Marine App Store.
Marine App Store
The marine apps are defined in the halos-marine-containers repository and distributed via the marine-container-store package. The store filters packages by the field::marine tag and organizes them into categories.
Install the marine stack with the halos-marine metapackage, or install individual apps from the Container Apps store in Cockpit.
Signal K Server
Marine data server and API hub.
| Property | Value |
|---|---|
| Package | marine-signalk-server-container |
| URL | https://halos.local/signalk-server/ |
| Direct port | 3000 (host networking) |
| Auth mode | none (OIDC configured separately) |
| License | Apache-2.0 |
Description
Signal K provides a central hub for collecting, processing, and distributing marine data. It supports NMEA 0183, NMEA 2000 (via CAN bus on HALPI2), and other sensor inputs. Features a WebSocket API for real-time data streaming, a plugin system, and a built-in web application server.
Network
Uses host networking (network_mode: host) for direct access to USB/serial devices and CAN bus interfaces. Still accessible via Traefik port-based routing.
OIDC Integration
Signal K has native OIDC support and authenticates directly with Authelia. Configuration is set via environment variables:
SIGNALK_OIDC_ENABLED=trueSIGNALK_OIDC_ISSUER=https://${HALOS_DOMAIN}/ssoSIGNALK_OIDC_AUTO_LOGIN=true
InfluxDB
Time-series database for marine data logging.
| Property | Value |
|---|---|
| Package | marine-influxdb-container |
| URL | https://halos.local/influxdb/ |
| Auth mode | none |
| License | MIT |
Description
InfluxDB stores timestamped data from Signal K, sensors, and other sources. Provides a built-in web UI for data exploration and supports the Flux query language. Commonly paired with Grafana for visualization.
Default Configuration
| Variable | Default |
|---|---|
INFLUXDB_ADMIN_USER |
admin |
INFLUXDB_ADMIN_PASSWORD |
halos-default |
INFLUXDB_DB |
marine |
Warning
Change the default InfluxDB credentials after first setup.
Grafana
Data visualization and monitoring platform.
| Property | Value |
|---|---|
| Package | marine-grafana-container |
| URL | https://halos.local/grafana/ |
| Auth mode | none (uses native OAuth with Authelia) |
| License | AGPL-3.0 |
Description
Grafana creates dashboards to visualize marine data from InfluxDB, Signal K, and other data sources. Supports rich visualization options including graphs, gauges, maps, and alerts. Grafana handles OAuth authentication natively via its prestart script, which registers with Authelia.
Recommended Packages
marine-influxdb-container-- Data source for Grafana dashboards
AvNav
Touch-optimized chart plotter for sailing and motor yachts.
| Property | Value |
|---|---|
| Package | marine-avnav-container |
| URL | https://halos.local/avnav/ |
| Auth mode | forward_auth |
| License | GPL-3.0 |
Description
AvNav is navigation software designed for touch operation on tablets and smartphones. Features include chart plotting (mbtiles, gemf, xml formats), route planning, AIS integration, anchor watch, and NMEA data display. Has a plugin system for extensions.
OpenCPN
Open source chart plotter and navigation software.
| Property | Value |
|---|---|
| Package | marine-opencpn-container |
| URL | https://halos.local/opencpn/ |
| Auth mode | none |
| License | GPL-2.0 |
Description
OpenCPN is a full-featured chart plotter supporting raster and vector charts, AIS target tracking, GPS and autopilot integration, weather routing, and an extensive plugin system.
Experimental Container
The OpenCPN container uses remote desktop streaming (selkies-gstreamer) to provide a web interface for a desktop application. This is experimental and may have performance limitations.
For a better experience, install OpenCPN natively on Desktop images:
Store Configuration
The marine store is defined in store/marine.yaml:
id: marine
name: Marine Navigation & Monitoring
description: |
  Applications for marine navigation, monitoring, and boat systems.

filters:
  include_origins:
    - "Hat Labs"
  include_tags:
    - field::marine

category_metadata:
  - id: navigation
    label: Navigation & Charts
  - id: chartplotters
    label: Chart Plotters
  - id: monitoring
    label: Data & Monitoring
  - id: communication
    label: Communication
  - id: visualization
    label: Visualization
Packages with the field::marine tag automatically appear in this store, organized by their category::* tags.
Cockpit Modules
HaLOS extends Cockpit with custom modules for container app management, package management, and user administration.
Standard Cockpit Modules
These modules ship with Cockpit and are available in all HaLOS installations:
| Module | Sidebar Name | Purpose |
|---|---|---|
| Overview | Overview | System resource monitoring (CPU, memory, disk, network) |
| Terminal | Terminal | Browser-based command line |
| Services | Services | systemd service management (start, stop, restart) |
| Logs | Logs | journald log viewer with filtering |
| Users | Users | User account management, password changes |
| Networking | Networking | NetworkManager configuration (WiFi, Ethernet, static IP) |
| Storage | Storage | Disk and filesystem management |
cockpit-apt (Packages)
APT package manager interface for Cockpit. Appears as Packages in the sidebar.
| Property | Value |
|---|---|
| Repository | cockpit-apt |
| Sidebar name | Packages |
| Tech stack | Python backend + React/TypeScript frontend |
Features
- Browse packages by Debian section
- Search packages by name or description
- View package details (version, dependencies, description)
- Install and remove packages
- Custom store views with tag-based filtering
Architecture
Three-tier design:
- Backend: Python CLI using
python-apt, communicates via JSON - API Layer: TypeScript wrapper around
cockpit.spawncalls - UI Layer: React + PatternFly components
cockpit-container-apps (Container Apps)
Container app store interface. Appears as Container Apps in the sidebar.
| Property | Value |
|---|---|
| Repository | cockpit-container-apps |
| Sidebar name | Container Apps |
Features
- Browse container apps by category
- View app details with icons and descriptions
- One-click install and removal
- Store filtering (e.g., Marine store shows only marine apps)
- Category-based organization using debtag facets
Relationship to cockpit-apt
cockpit-container-apps shares vendored utilities from cockpit-apt. It provides a curated, visual interface specifically for container applications, while cockpit-apt handles general Debian packages.
cockpit-dockermanager-debian
Docker container manager for Cockpit.
| Property | Value |
|---|---|
| Repository | cockpit-dockermanager-debian |
Features
- View running Docker containers
- Start, stop, and restart containers
- View container logs
- Inspect container details (ports, volumes, environment)
cockpit-authelia-users
Authelia user management module for Cockpit.
| Property | Value |
|---|---|
| Repository | cockpit-authelia-users |
Features
- Manage Authelia SSO users
- Add and remove users
- Change user passwords
- Manage group memberships
Relationship to System Users
This module manages Authelia users (for SSO/web app authentication), which are separate from Linux system users (managed by the standard Cockpit Users module).
halos-cockpit-config
Cockpit branding and configuration for HaLOS.
| Property | Value |
|---|---|
| Repository | halos-cockpit-config |
Purpose
Configures Cockpit for the HaLOS environment:
- Custom branding (logo, colors)
- Default module visibility and ordering
- System-level Cockpit configuration
Accessing Cockpit
Cockpit is always accessible at https://halos.local:9090/ using Linux system credentials (pi/halos by default).
It is also accessible via https://halos.local/cockpit/ (which redirects to port 9090).
Appendices
Roadmap
Planned features and improvements for HaLOS.
Living Document
This roadmap reflects current plans and priorities. Features and timelines may change based on community feedback and development resources.
Current Focus
App Ecosystem Expansion
- More container apps -- Expanding the app store with additional marine and general-purpose applications
- Imported app catalog -- Auto-importing curated apps from CasaOS, Runtipi, and other open-source app stores
- App update mechanism -- Streamlined updates for container apps via APT
Authentication and Security
- Let's Encrypt support -- Automatic TLS certificates for internet-facing deployments
- Two-factor authentication -- TOTP support via Authelia for additional security
Hardware Support
- Broader SBC support -- Investigating support for additional single-board computers beyond Raspberry Pi
- HALPI2 enhancements -- Continued improvements to CAN bus, RS-485, and I2C integration
Planned Improvements
User Experience
- Guided setup wizard -- First-boot configuration wizard for WiFi, hostname, and credentials
- Dashboard customization -- More layout options and widgets for the Homarr dashboard
- Improved app store -- Enhanced search, ratings, and app detail pages
Developer Experience
- Plugin SDK -- Tools and templates for third-party app developers
- Local development environment -- Simplified local testing without a physical device
- API documentation -- OpenAPI specs for internal service APIs
System
- Automated backups -- Scheduled backup and restore for app data and configuration
- OTA updates -- Over-the-air system image updates
- Multi-device management -- Central management of multiple HaLOS devices
How to Contribute
Feature requests and ideas are welcome. See the Contributing guide for how to get involved, or open an issue in the relevant GitHub repository.
FAQ
Frequently asked questions about HaLOS.
General
What is HaLOS?
HaLOS (Hat Labs Operating System) is a custom Raspberry Pi OS distribution that turns a Raspberry Pi into a managed appliance with a web-based interface. It provides a dashboard, app store, single sign-on, and reverse proxy out of the box.
What hardware does HaLOS support?
HaLOS runs on Raspberry Pi 4 and Raspberry Pi 5 boards (64-bit/arm64). The HALPI2 variants additionally support the HALPI2 hardware module with CAN bus, RS-485, and I2C interfaces for marine and industrial use.
Is HaLOS free?
Yes. HaLOS is open-source software. The source code is available on GitHub under various open-source licenses.
How is HaLOS different from other Pi distributions?
HaLOS is purpose-built as a managed appliance platform. Unlike general-purpose Pi distributions, it includes a web dashboard, app store, SSO authentication, and reverse proxy pre-configured and ready to use. The marine variants add curated navigation and monitoring apps.
Installation
Which image should I download?
See Choosing an Image for a detailed comparison. In short:
- HALPI2 images if you have HALPI2 hardware
- RPI images for standard Raspberry Pi 4/5
- Marine variants if you want pre-installed marine navigation and monitoring apps
- Desktop variants if you need a local display
Can I install HaLOS on an existing Raspberry Pi OS?
Yes, if you're running Debian Trixie (arm64). See Installing on Existing OS for instructions.
How long does the first boot take?
The initial boot takes 2-3 minutes while Docker containers start for the first time. Subsequent boots are faster.
Access and Authentication
What are the default credentials?
HaLOS has two authentication systems:
| System | Username | Password | Used for |
|---|---|---|---|
| Authelia SSO | admin |
halos |
Web applications (dashboard, apps) |
| Linux system | pi |
halos |
Cockpit, SSH, terminal |
Warning
Change both sets of credentials after first boot.
Why do I get a certificate warning?
HaLOS uses a self-signed TLS certificate generated on first boot. Browsers don't trust self-signed certificates, so they show a warning. This is expected -- accept the warning to proceed. The connection is still encrypted.
How do I access the system if the web interface is down?
Connect via SSH (ssh pi@halos.local) or access Cockpit directly at https://halos.local:9090/. Cockpit uses Linux system authentication, which is independent of the SSO system.
Apps and Services
How do I install apps?
Open Cockpit and navigate to Container Apps for container applications or Packages for general Debian packages. See Installing Apps for details.
Where is app data stored?
Container app data is stored under /var/lib/container-apps/<app-name>/. Each app has its own directory with configuration files and persistent data volumes.
How do I update apps?
Run sudo apt update && sudo apt upgrade from the terminal or use Cockpit's Packages module. Container app updates are delivered as Debian package updates.
Can I add my own Docker containers?
Yes, but for full integration (dashboard tile, SSO, port-based routing), package them using the container-packaging-tools. Standalone Docker containers will work but won't appear in the dashboard or use the SSO system.
Networking
How does halos.local name resolution work?
HaLOS uses mDNS (multicast DNS) via Avahi to advertise the device hostname (halos.local) on the local network. Apps are accessed via path redirects on this hostname (e.g., halos.local/grafana/). See Networking for details.
Can I change the hostname from halos?
The hostname can be changed, but it affects all URLs (halos.local becomes newhostname.local). The TLS certificate is regenerated to match the new hostname. Bookmarks and saved URLs will need to be updated.
Can I access HaLOS from the internet?
HaLOS is designed for local network use. Internet access requires additional configuration (port forwarding, dynamic DNS, proper TLS certificates) that is not provided out of the box.
Troubleshooting
The dashboard shows no app tiles
The homarr-container-adapter may not have synced yet. Wait a minute for auto-discovery, or check that containers are running with docker ps.
How do I get help?
- Check the Troubleshooting guide
- Open an issue on GitHub
- See Contributing for community channels